
How to Create an App: Complete Guide for 2026
The complete guide to creating an app in 2026, written for founders, product managers, and small business owners. Walks through 11 numbered steps from validating whether you actually need an app, through user flows and design, to picking native versus no-code versus cross-platform, App Store and Google Play submission, and post-launch maintenance. Covers realistic costs, timelines, and the mistakes that trip up most first-time builders. Pairs the high-level guide with a no-code path for teams without engineering.
Building an app has never been more accessible, yet most projects still fail before reaching the app store. The difference between success and failure typically comes down to understanding what you're actually building, choosing the right approach for your situation, and having realistic expectations about time, cost, and complexity.
When you decide to create an app, the intention should be to solve problems for real people and not just building a piece of software. This guide covers everything from initial concept through post-launch maintenance. It covers the technical choices you'll face, the real costs and timelines involved, and the mistakes that trip up most first-time builders.
IMPORTANT: If you don't know how to code or you have a constrained budget, see how to create an app without coding using Swiftspeed AI app builder tool here.

Step 1: Determine If You Actually Need to Build an App
Before investing time and money to build an app, determine whether an app is the right solution. Many businesses rush to create an app because competitors have one, not because their users actually need it. Apps excel when users need repeated access to functionality. If someone will use your service daily or weekly, an app provides faster access than opening a browser and navigating to a website. The app icon on their home screen serves as a constant reminder and reduces friction.
Native device features often justify the decision to make an app. If your solution requires camera access, GPS tracking, push notifications, or offline functionality, an app provides capabilities that mobile websites can't match. When you build an app with these features, you're leveraging the full power of mobile devices in ways browsers simply cannot.
Apps also work well for complex interactions that benefit from native UI elements. The gestures users know from using thousands of apps translate directly to yours when you create an app using platform conventions. Swiping, pinching, and dragging feel natural in apps but can be clunky in mobile browsers.
However, if users need your service occasionally rather than repeatedly, a mobile-optimized website often serves them better. They can access it when needed without downloading anything. Content-focused experiences typically work well on mobile websites. If you're primarily delivering information rather than interactive functionality, a responsive website reaches more people with less effort than building an app from scratch.
Simple transactional services that don't require device features often don't justify app development costs. If users are just viewing information or completing basic forms, a good mobile website accomplishes the goal without the overhead of app store management and native development. Ask yourself: will users want this on their home screen? If the honest answer is no, start with a mobile website. You can always create an app later if demand justifies it.
Step 2: Define the Problem You're Solving
Every successful app solves a specific problem for specific people, this means that your app idea has to be solid. Vague concepts don't provide enough direction to guide development decisions. When you set out to create an app, you need clarity about exactly what problem you're solving.
Write down the problem in one sentence without using buzzwords. For example: "Freelancers working across multiple client projects can't easily track which hours are billable to which client without switching between multiple tools." That's specific enough to build from. It identifies who will benefit, what situation they're in, and what problem they face. When you build an app with this clarity, every feature decision becomes easier because you can evaluate it against whether it helps solve that specific problem.
Compare that to "help people manage their time better," which isn't actionable. Better for whom? What aspect of time management? What's the actual pain point? These vague statements might sound good, but they don't help you make an app that solves real problems.
Talk to potential users before deciding what to build. Ask about their current process, what tools they use, where things break down. Listen for phrases like "I wish I could" or "it's annoying that" or "I waste so much time." These reveal genuine frustration, which indicates problems worth solving when you create an app.
Not every problem is worth solving. Some problems are minor annoyances that people won't change their behavior to fix. Ask potential users: "If this problem were solved, how would your day change?" If they struggle to articulate meaningful impact, the problem might not be severe enough to sustain an app. Look for money or time as indicators. If people are currently paying for imperfect solutions, that signals genuine need. If they're spending significant time on workarounds, that also indicates a problem worth solving when you decide to make an app.
Step 3: Identify Your Targeted Audience
Knowing who will use your app shapes every decision. "Everyone" is not a target audience. When you create an app for everyone, you end up creating an app for no one. Identify 2-3 specific types of people who will use what you build.
For each user type, document their demographics, current behavior, motivations, and technical environment. A useful profile looks like: "Sarah, 32, freelance graphic designer. Works from home office on MacBook but needs to track time and expenses from her iPhone throughout the day. Currently uses separate apps for time tracking, invoicing, and expense photos. She's comfortable with apps but gets frustrated by anything that requires more than a few taps to complete common tasks. Willing to pay $10-15 monthly for tools that save her time."
That profile tells you what platform to prioritize when you build an app, what features matter most, what the experience should feel like, and what pricing is viable. Don't assume you are your target user unless you genuinely are. If you're highly technical, younger, or more patient than most people, your preferences probably don't represent your market. Build an app for your users, not for yourself.
Before you create an app, validate that people actually want what you're planning. Search app stores for apps attempting to solve similar problems. If you find many competitors, that's often a good sign rather than bad. It means the market exists and people are willing to download apps for this purpose. When you make an app in a proven category, you're reducing market risk.
Study existing app reviews, particularly negative ones. They reveal what current solutions do poorly, which helps you identify opportunities for differentiation. Look for patterns in complaints. If dozens of reviews mention the same frustration, you've found a real gap that you can address when you build an app better than what exists.
Create a simple landing page describing your app concept. Run ads targeting potential users and measure how many sign up for updates. This tests whether people care enough to take even minimal action before you invest months to create an app. If 1000 targeted visitors produce zero interest, reconsider your concept. Most validation efforts should cost hundreds of dollars and take days or weeks, not months and thousands. You're testing assumptions, not building the product yet.
Step 4: Prioritize Features Ruthlessly
Apps that try to do everything accomplish nothing particularly well. When you make an app that focuses on one thing and does it extremely well, you're more likely to succeed than if you build an app trying to serve every possible use case.
Use a three-tier system: core features, important features, and nice-to-have features. Core features are the absolute minimum your app needs to function. These features define why your app exists. For a food delivery app, that's browsing restaurants, placing orders, and tracking delivery, these core features must work reliably before you add anything else.
Important features significantly improve the experience but aren't strictly necessary. For food delivery, that might be saved favorites or order history. These features make the app noticeably better for people who use it regularly and justify continued engagement. Add these for version 1.1 or 1.2, not 1.0. Build an app with a clear roadmap, but don't try to build the entire roadmap before launch.
Build only core features for your first version. Everything else waits. This focus forces clarity and gets you to market faster with less risk. Throughout development, people will suggest features. If it's not core and you haven't launched yet, the answer is: "Great idea, we'll consider it for a future update." This discipline prevents scope creep, which kills more app development projects than any technical challenge.
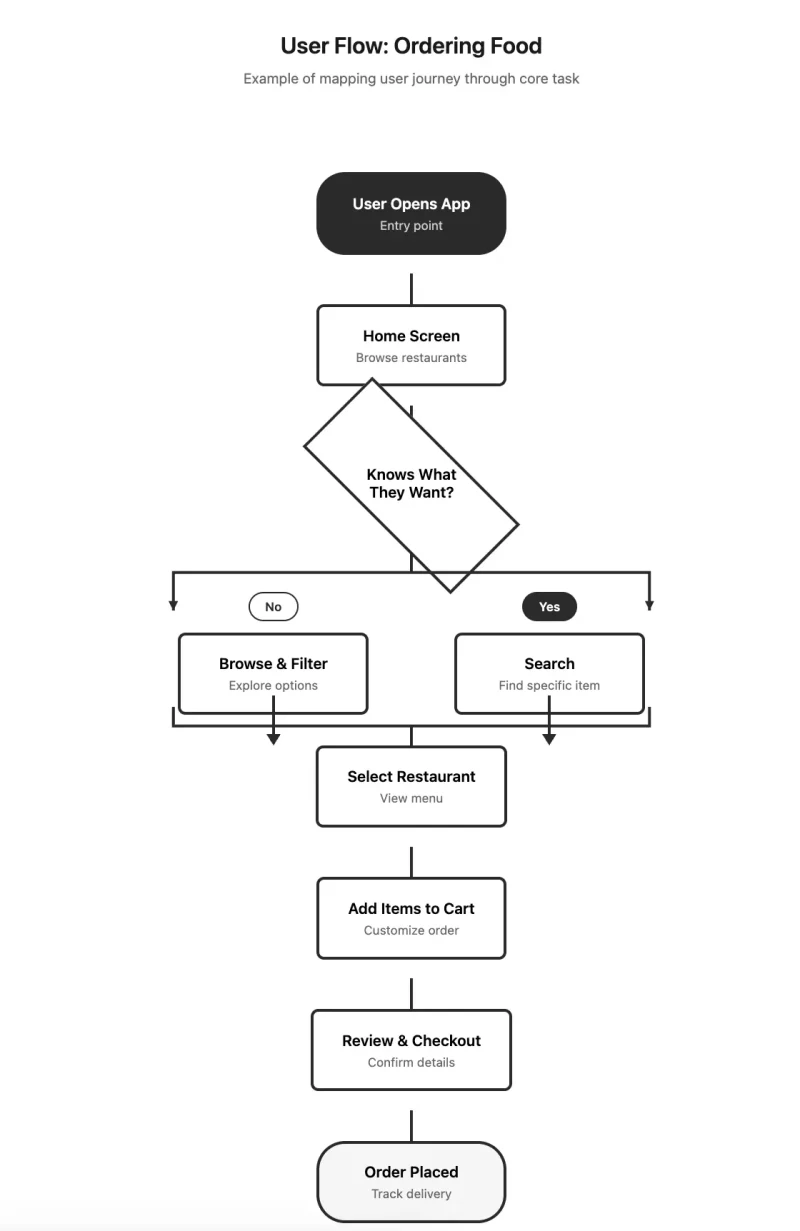
Step 5: Map User Flows and Create Wireframes
Wireframes are rough sketches showing screen layout and navigation without visual design. Start with paper or a whiteboard. Draw boxes representing screens, label each, and draw arrows showing how users move between screens. This low-fidelity approach encourages experimentation when you're figuring out how to build an app structure.
Before designing screens, map out how users move through your app to accomplish key tasks. Pick your app's most important task and document every step from app launch to task completion. When you build an app, understanding these flows prevents you from creating confusing navigation or unnecessary steps.
Count the steps. Can you eliminate any? Every additional step loses some percentage of users. If it takes twelve taps to order food, most people won't complete the process when competing apps do it in six. Keep the path to core functionality short. Users who download an app want to accomplish something specific. Let them do it immediately when you create an app with clear, direct paths to value.
Make the next step obvious on every screen. Each screen should have one primary action that's visually dominant. Secondary actions can exist but shouldn't compete for attention. When you make an app that guides users clearly through each step, completion rates improve dramatically.
Show wireframes to potential users and walk them through tasks. Watch where they hesitate. Listen for "wait, what does this do?" or "how do I get back?" These moments reveal confusion that will only multiply in the actual app. Don't defend your designs. When someone doesn't understand something, resist explaining why it makes sense. If it's not obvious to fresh eyes, it won't be obvious to users. When you create an app based on tested wireframes, you're building with validated user understanding rather than assumptions.
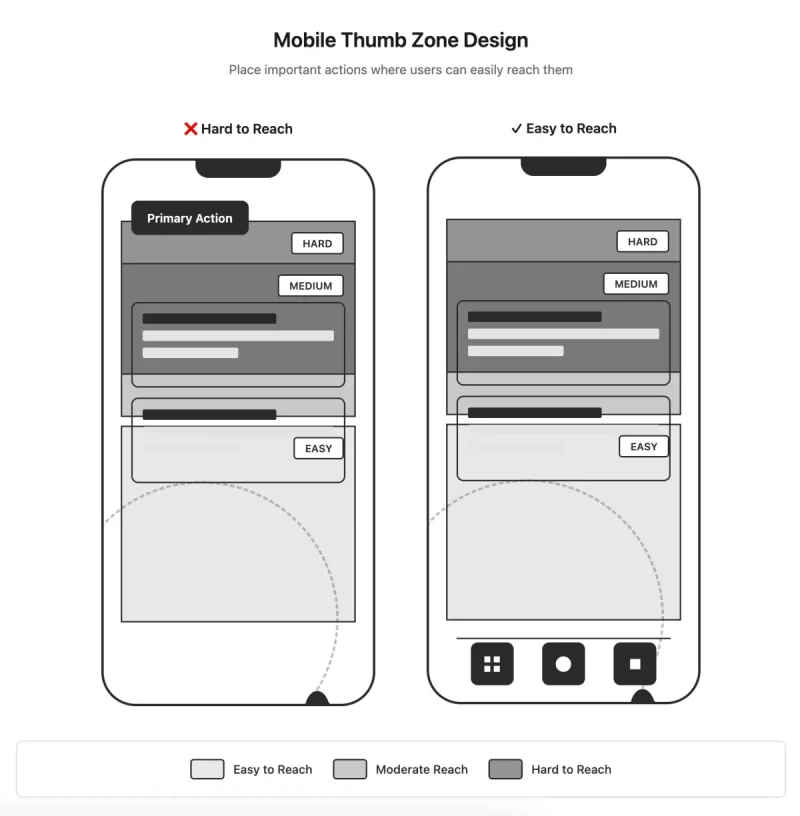
Step 6: Apply Mobile Design Principles
Good mobile design is fundamentally different from web design. When you build an app, you're designing for thumbs, not mouse pointers. Most people hold phones with one hand and interact with their thumb. The thumb can comfortably reach the bottom and middle of the screen but struggles with the top corners, especially on larger phones.
Place frequent actions in thumb-friendly zones: the bottom half of the screen and the center. Navigation bars work better at the bottom than the top. When you make an app with important actions at the top of the screen, you're making users stretch uncomfortably on every interaction. Make tap targets at least 44x44 pixels. Anything smaller leads to mis-taps and frustration.
Small screens force choices about what to show. Each screen should have one primary purpose. When you create an app, ruthlessly prioritize what appears on each screen. Important information should be immediately visible. Users shouldn't have to search for critical details. Use visual hierarchy through size, color, contrast, and spacing to establish importance.
Text needs to be readable at arm's length on a small screen. Sixteen pixels is generally the minimum for body text. Use short lines and paragraphs. Break content into scannable chunks. Ensure sufficient contrast between text and background. What looks great on your desktop monitor might be unreadable in sunlight. When you build an app, test designs in various lighting conditions.
Design for slow connections and loading delays. Show skeletons or placeholders while content loads rather than blank screens. Design empty states thoughtfully. When users first open the app or when they've cleared everything from a list, show helpful content rather than a void. When you make an app that handles loading states gracefully, users perceive it as faster and more polished.
Step 7: Choose Your Development Approach
If you are weighing no-code vs custom development, our BuildFire alternative and best app builder alternative comparisons cover the no-code landscape, and the AI app builder alternative pillar covers Bolt, Lovable, Replit, and Emergent for AI-first builders.
How you build an app determines cost, timeline, flexibility, and long-term maintenance requirements. Native development means writing separate code for each platform. iOS apps use Swift in Xcode. Android apps use Kotlin in Android Studio. When you create an app natively, you get maximum performance and full access to every device capability. Apps feel polished because they use platform-native UI components.
However, building for both platforms means building everything twice with different code and different developers. Cost ranges from $50,000 to $300,000+ for both platforms, taking 6-12 months for moderately complex apps. When you build an app this way, you're making the largest time and money investment but getting the highest quality result. This approach is best for apps where performance is critical like games, AR/VR, or intensive computation.
Cross-platform frameworks let you write code once and deploy to both iOS and Android. Popular frameworks include React Native and Flutter. When you create an app with cross-platform tools, single codebase means faster development and lower cost than native, typically $30,000-$100,000 for both platforms over 3-6 months. Performance is usually good enough for typical apps. When you build an app for most business purposes, content delivery, ecommerce, or productivity, cross-platform delivers excellent results at reasonable cost.
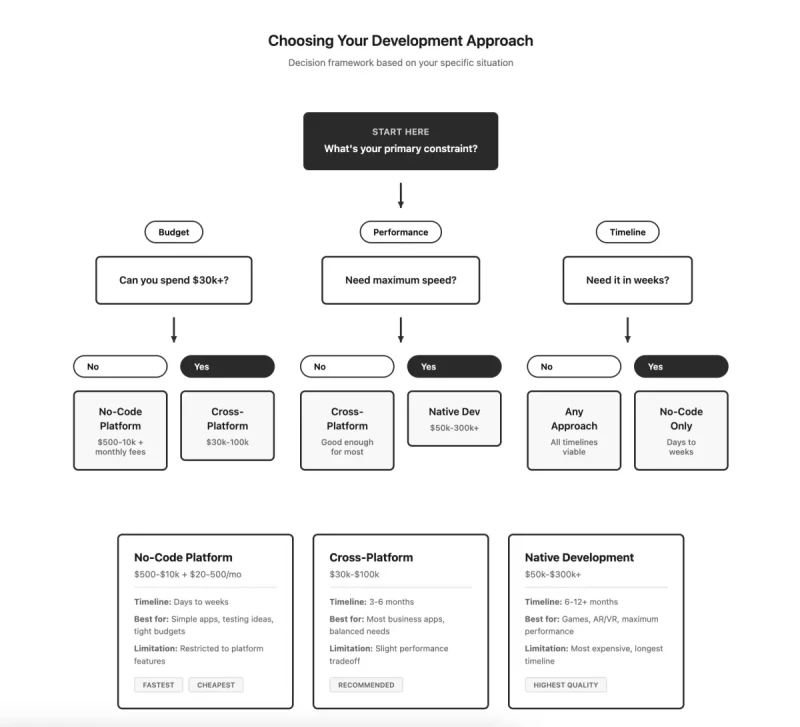
No-code platforms let you build an app through visual interfaces without writing code. Very fast to build, no coding skills required, and much cheaper at $500-$10,000 in development time plus $20-$500 monthly platform fees. Development takes days to weeks for simple apps. When you create an app with no-code tools, you're limited to what the platform supports. Adding custom features is difficult or impossible. This approach works best for testing ideas before committing to full development or for simple apps with standard features.
Progressive web apps are websites that behave somewhat like apps. They can be installed on the home screen and work offline to some degree. Single codebase works everywhere. When you make an app as a PWA, you avoid app store approval processes and updates deploy instantly. However, limited device feature access and incomplete iOS support restrict what you can build. When you create an app primarily as a content or information service, PWAs offer a fast, affordable path to mobile users.
Step 8: Understand App Backend Requirements
Most apps need a backend for data storage, user authentication, and business logic. Backend as a Service platforms like Firebase or Supabase provide pre-built backends you configure rather than build. When you create an app using BaaS, these platforms handle authentication, databases, file storage, and APIs out of the box. They're fast to set up, handle scaling automatically, and have generous free tiers.
Custom backends built with frameworks like Node.js, Django, or Ruby on Rails give you complete control. When you build an app requiring specific optimizations or unusual backend requirements, custom development provides the flexibility you need. However, this requires backend developers and more time to build. Most apps can start with BaaS and only move to custom backends if they hit platform limitations.
For databases, SQL databases like PostgreSQL work well for structured data with clear relationships. NoSQL databases like MongoDB work well for flexible or document-based data. When you create an app, most can use either successfully. SQL databases are usually the safer default choice because they enforce data consistency.
Frontend development builds what users see and interact with. Modern development breaks interfaces into reusable components. When you build an app this way, you create buttons, form fields, lists, and cards once, then use them throughout the app. This speeds development and maintains consistency.
Your app makes numerous requests to the backend for data. When you create an app, each request can succeed, fail, or take too long. Your interface must handle all three cases with loading indicators, error messages, and timeouts. Optimize images by compressing them and serving appropriate sizes. Implement lazy loading for content that's not immediately visible. Cache data locally so users don't wait for repeated network requests.
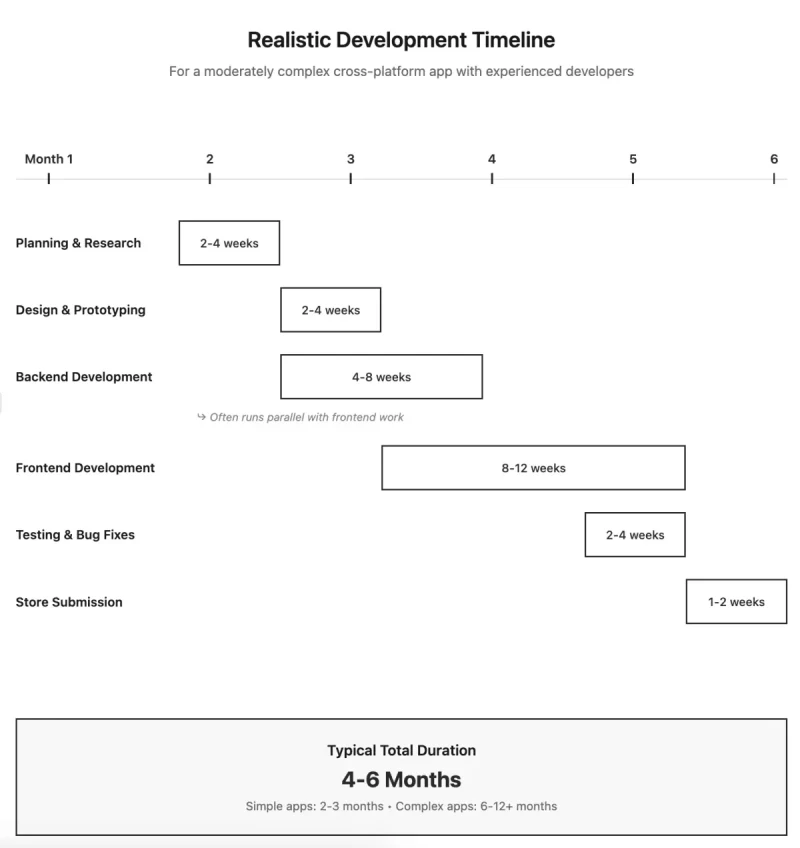
Test on actual devices, particularly mid-range and older models. An app that feels smooth on new devices might be unusable on three-year-old phones. When you build an app that performs well on older hardware, you're serving a larger portion of your potential user base. Real development timelines for a moderately complex app break down like this: two to four weeks for backend setup, four to eight weeks for frontend implementation, two to three weeks for polish, and two to three weeks for testing. That's three to five months when you create an app with experienced developers working full-time.
Step 9: Test Thoroughly Before Launch
Testing isn't one thing when you build an app; it's many different verification processes. Functional testing verifies that features work as designed. Test the happy path first, then test edge cases and error conditions. What happens when users enter invalid data? When they lose internet mid-transaction? Create test checklists for each feature listing all scenarios to verify.
Usability testing involves watching real people use your app. When you make an app and think the interface is obvious, fresh users often reveal surprising confusion. Give them tasks to complete without instructions beyond the task description. Observe where they hesitate, what confuses them, and whether they complete tasks successfully. Five usability test sessions typically reveal the majority of significant issues.
Performance testing measures how fast your app responds. Launch time should be under 3 seconds. Screen transitions should be under 100 milliseconds. Test with slow network connections using network throttling tools to simulate 3G speeds. Monitor memory usage during extended sessions. When you create an app that performs well under challenging conditions, you're delivering quality that users notice.
Device compatibility testing verifies your app works across various devices and OS versions. When you build an app, test on multiple devices and screen sizes from small phones to large tablets. Test different OS versions, particularly the current version and two versions back. Users don't all update immediately, so supporting recent older versions captures more of your audience.
Beta testing puts your app in users' hands before public launch. Recruit 20-50 testers who represent your target users. TestFlight for iOS and Google Play Console for Android provide infrastructure for distributing beta builds. When you create an app and run proper beta testing for 2-4 weeks, you catch problems that internal testing missed. Continue until new bug reports slow to a trickle and no critical issues remain.
Step 10: Navigate App Store Submission
Each platform has specific requirements when you build an app for their store. iOS App Store requires apps to run on current iOS version and use Apple's Human Interface Guidelines to avoid App Store rejection. Apps must be complete and functional with no placeholder content. You need a paid Apple Developer account at $99 annually. Initial reviews take 1-7 days, averaging 24-48 hours.
Google Play Store requires apps to target recent Android API levels and follow Material Design principles. Google Play Developer account costs $25 one-time. When you create an app for Android, automated review typically completes within hours, though manual review takes 1-7 days if triggered.
Write clear app descriptions explaining what your app does. When you make an app, your store listing is often the first interaction potential users have with your work. Create app store screenshots for each required device size showing actual app functionality. Design an app icon that's recognizable at small sizes and clearly represents what your app does.
Common rejection reasons include crashes or bugs, missing privacy policies, placeholder content, and misleading metadata. When you build an app and submit it, plan for potential rejection and resubmission. First submissions often get rejected for minor issues that are easy to fix once identified. Address the stated issues and resubmit promptly.
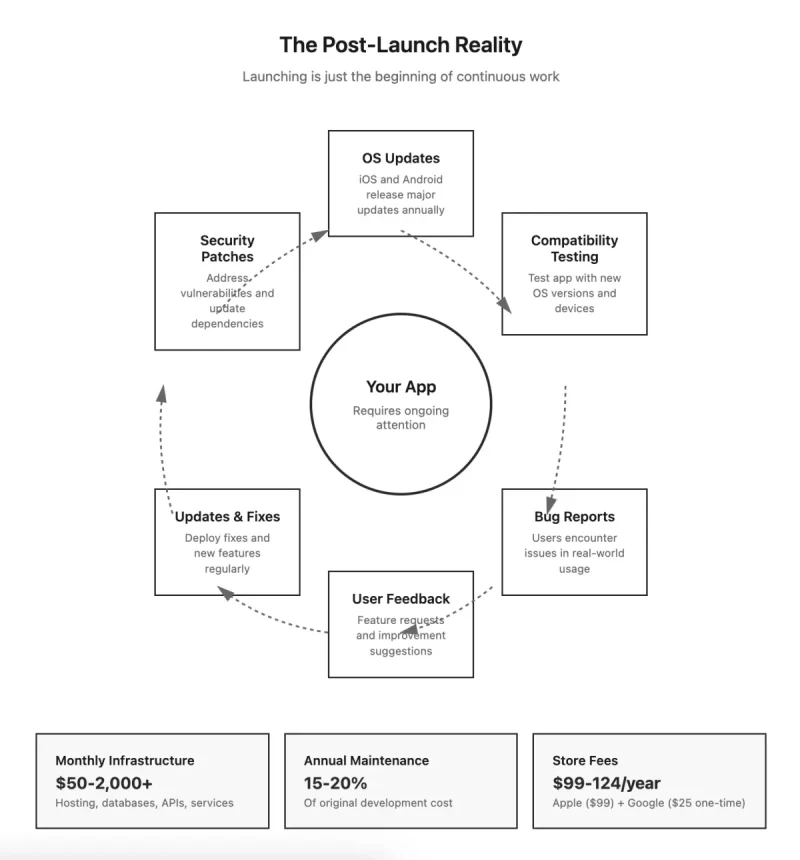
Step 11: Plan for Ongoing Maintenance
Apps require ongoing maintenance even if you never add features. Apple and Google release major OS updates annually. When you create an app, you must ensure it works with new OS versions before users update or they'll encounter crashes. Beta versions of upcoming releases are available months in advance. Test your app with betas and fix incompatibilities before public release.
Third-party libraries your app uses release updates regularly. When you build an app using external dependencies, update them at least quarterly. Security vulnerabilities get discovered in libraries and frameworks. Apply security patches promptly to protect user data.
Budget 15-20% of original development cost annually for maintenance. A $60,000 app typically requires $9,000-$12,000 yearly to maintain properly. This covers OS compatibility updates, security patches, dependency updates, and backend maintenance. Many people focus on the cost to create an app but underestimate ongoing expenses.
Collect user feedback systematically when you make an app. Provide an easy way for users to report problems or suggest features. Check app store reviews daily during the first weeks after launch. Set up analytics to track user behavior. Tools like Amplitude or Mixpanel show which features get used and where users get stuck.
Track essential metrics: daily and monthly active users, retention rates, session length and frequency, feature usage, conversion rates, and crash rates. Review analytics weekly to spot trends before they become serious problems. When you build an app and actively monitor these metrics, you can respond to issues quickly rather than discovering problems after significant user loss.
Understanding Real Costs and Timelines
When you decide to create an app, understanding realistic costs prevents budget surprises. Simple apps with basic functionality and minimal backend cost $20,000-$40,000 and take 2-3 months. Standard business apps with professional design, substantial backend, and third-party integrations cost $50,000-$100,000 over 4-6 months. When you build an app with sophisticated functionality, expect $100,000-$300,000+ over 6-12 months.
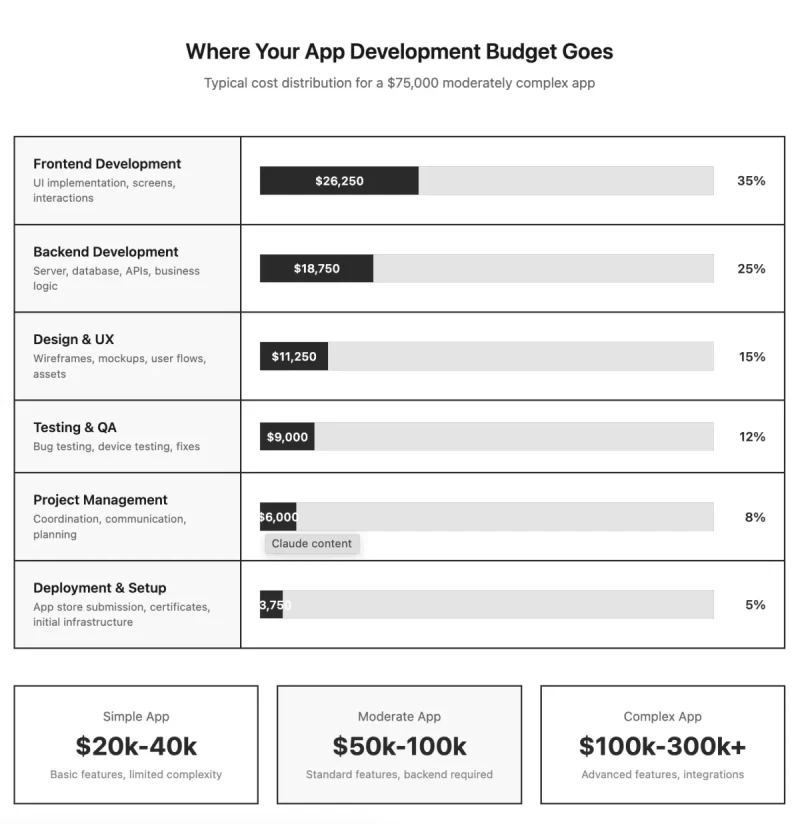
No-code platforms cost $500-$10,000 in development time plus monthly fees. When you make an app this way, the low upfront cost is attractive, but monthly fees accumulate. Native development costs 30-40% more than cross-platform due to doubled development effort. Ongoing costs add 15-20% of initial development cost annually.
Expect to spend on app store fees ($99/year for Apple, $25 one-time for Google), backend hosting ($50-$500+ monthly), third-party services ($50-$300 monthly for analytics, crash reporting, notifications), and developer time for updates and maintenance. When you create an app for $75,000, budget $1,000-$1,500 monthly to keep it running properly.
Monetization and Marketing Your App
Apps generate revenue through various models. Paid downloads charge users upfront, typically $1-$10. When you make an app with upfront pricing, you need very clear value proposition because users must trust your app provides value without trying it. Freemium offers basic functionality free with paid upgrades for premium features. Lower barrier to entry but most users never convert.
Subscriptions charge recurring monthly or annual fees, typically $5-$50 monthly. When you build an app with subscription model, you get predictable recurring revenue but users increasingly resist subscriptions. Works best for apps users engage with repeatedly. In-app purchases sell individual items or content within free apps. Popular in games where highly engaged users can spend much more than subscription cost.
👉🏾 Other Swiftspeed users also read: Powerful App Monetization Strategy To Earn More
App store search drives the majority of downloads. When you create an app, research keywords users search for related to your functionality. Include high-volume, relevant keywords naturally in your app name and description. Get reviews and ratings early as apps with many positive reviews rank higher.
Build anticipation before launch with a landing page collecting email signups. Reach out to relevant bloggers and journalists who cover your category. When you make an app worth talking about, media coverage can drive significant initial downloads. Create preview content showing your app in action. Short videos demonstrating key features generate more interest than screenshots.
Share helpful content related to your app's domain on social media. When you build an app and provide value through your content marketing, you build audience and trust. Partner with complementary products. Integration with popular services exposes your app to their user base.
Common Mistakes to Avoid
The most expensive mistake is building something nobody wants. Spending months and tens of thousands to create an app before confirming demand wastes resources. Validate the core concept cheaply first with landing pages, mockups, and conversations with potential users. Understand app usage statistics in order to make data informed decision.
Scope creep kills projects. Every project faces requests for additional features when you are building an app. Each addition extends timeline and cost. Implement change control and make deliberate decisions about whether additions are worth the tradeoff.
Don't assume you're the user. Designers and developers often build an app they wish existed, then discover they're not representative users. Talk to actual users regularly and test with people who match your target audience.
Getting features to mostly work represents 60% of development effort. The remaining 40% is polish. When you create an app, budget time for making things work reliably in all scenarios. Performance problems often don't appear until testing on real devices. Test on mid-range and older devices early.
Weak onboarding loses users before they experience your app's value. Minimize steps to value and let users accomplish something meaningful within 30 seconds when you make an app. Many excellent apps get buried because developers didn't optimize store listings. Invest time in keywords, screenshots, and descriptions.
Frequently asked questions
Here are some asked questions about app development processes.
Final Thoughts
Creating an app is more accessible than ever, but success still requires planning, realistic expectations, and commitment to quality. Start by validating that people want what you're planning to build. Choose a development approach matching your budget, timeline, and technical capabilities. Focus on core functionality rather than trying to build everything at once. Test thoroughly before launching. Then plan for the ongoing work required to maintain and improve your app based on how people actually use it.
The difference between abandoned app projects and successful ones usually isn't technical difficulty. It's having clear purpose, making pragmatic decisions about scope, and following through on the unglamorous work of testing, refinement, and maintenance.