How to Publish on the App Store
Before You Start
This article walks you through publishing your Swiftspeed-built iOS app to the App Store yourself: download the Xcode workspace from the editor, sign it with your Apple Developer team, archive it on your Mac, upload to App Store Connect, fill in the metadata and screenshots, submit for review.
Prefer not to deal with Xcode at all? Swiftspeed also offers 1-Click Publishing where we handle the entire submission for you, including version updates and rejection rebuilds. See the 1-Click Publishing guide for that path.
Five things you need to self-publish:
Apple Developer Program account ($99 / year). Enroll here with the Apple ID you want listed as the developer. Approval takes 24 to 48 hours for individuals, longer for companies (D-U-N-S verification).
A Mac running the latest stable Xcode (18 or newer). Xcode is a free 8 to 12 GB download from the Mac App Store.
The Xcode source ZIP generated from the Swiftspeed editor. Walked through below.
Marketing assets: app icon (1024x1024 PNG, no transparency, no rounded corners, Apple rounds them), iPhone screenshots in two sizes (6.7-inch at 1290x2796 and 6.5-inch at 1242x2688), promotional text (170 chars), description (4000 chars), keywords (100 chars). The Swiftspeed Screenshot Mockup tool can help you generate the iPhone screenshots in 30s.
A privacy policy URL that is publicly reachable. Apple rejects every submission without one. Use Settings > Privacy Policy in the editor, it generates a hosted policy url, and you can copy and paste straight into App Store Connect.
Generating the Xcode Source in the Swiftspeed Editor
Apple does not accept AAB or APK. Instead, Swiftspeed packages a Capacitor-based Xcode workspace that you archive yourself on your Mac. The editor produces the ZIP from the same Generate flow.
From the dashboard, click the edit pencil on the app you want to publish.
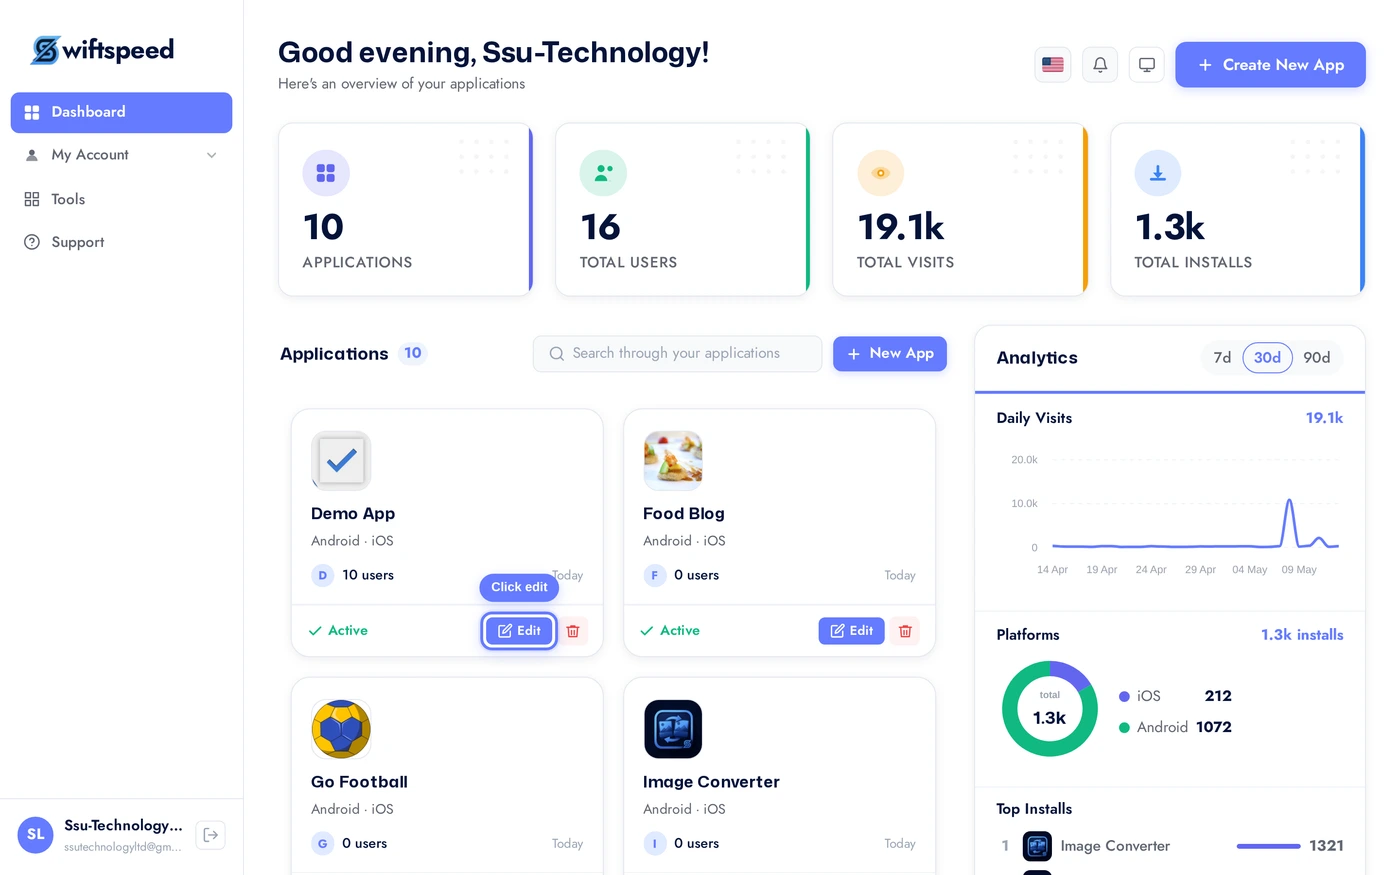
Top bar > Download > App Info sub-tab. Fill in the App Configuration card: bundle ID (e.g. com.yourbrand.appname, must match what you register in App Store Connect later), build number (auto-bumped), version (e.g. 1.0.0). Click Save Configuration. These values are baked into the IPA and visible on the App Store listing.
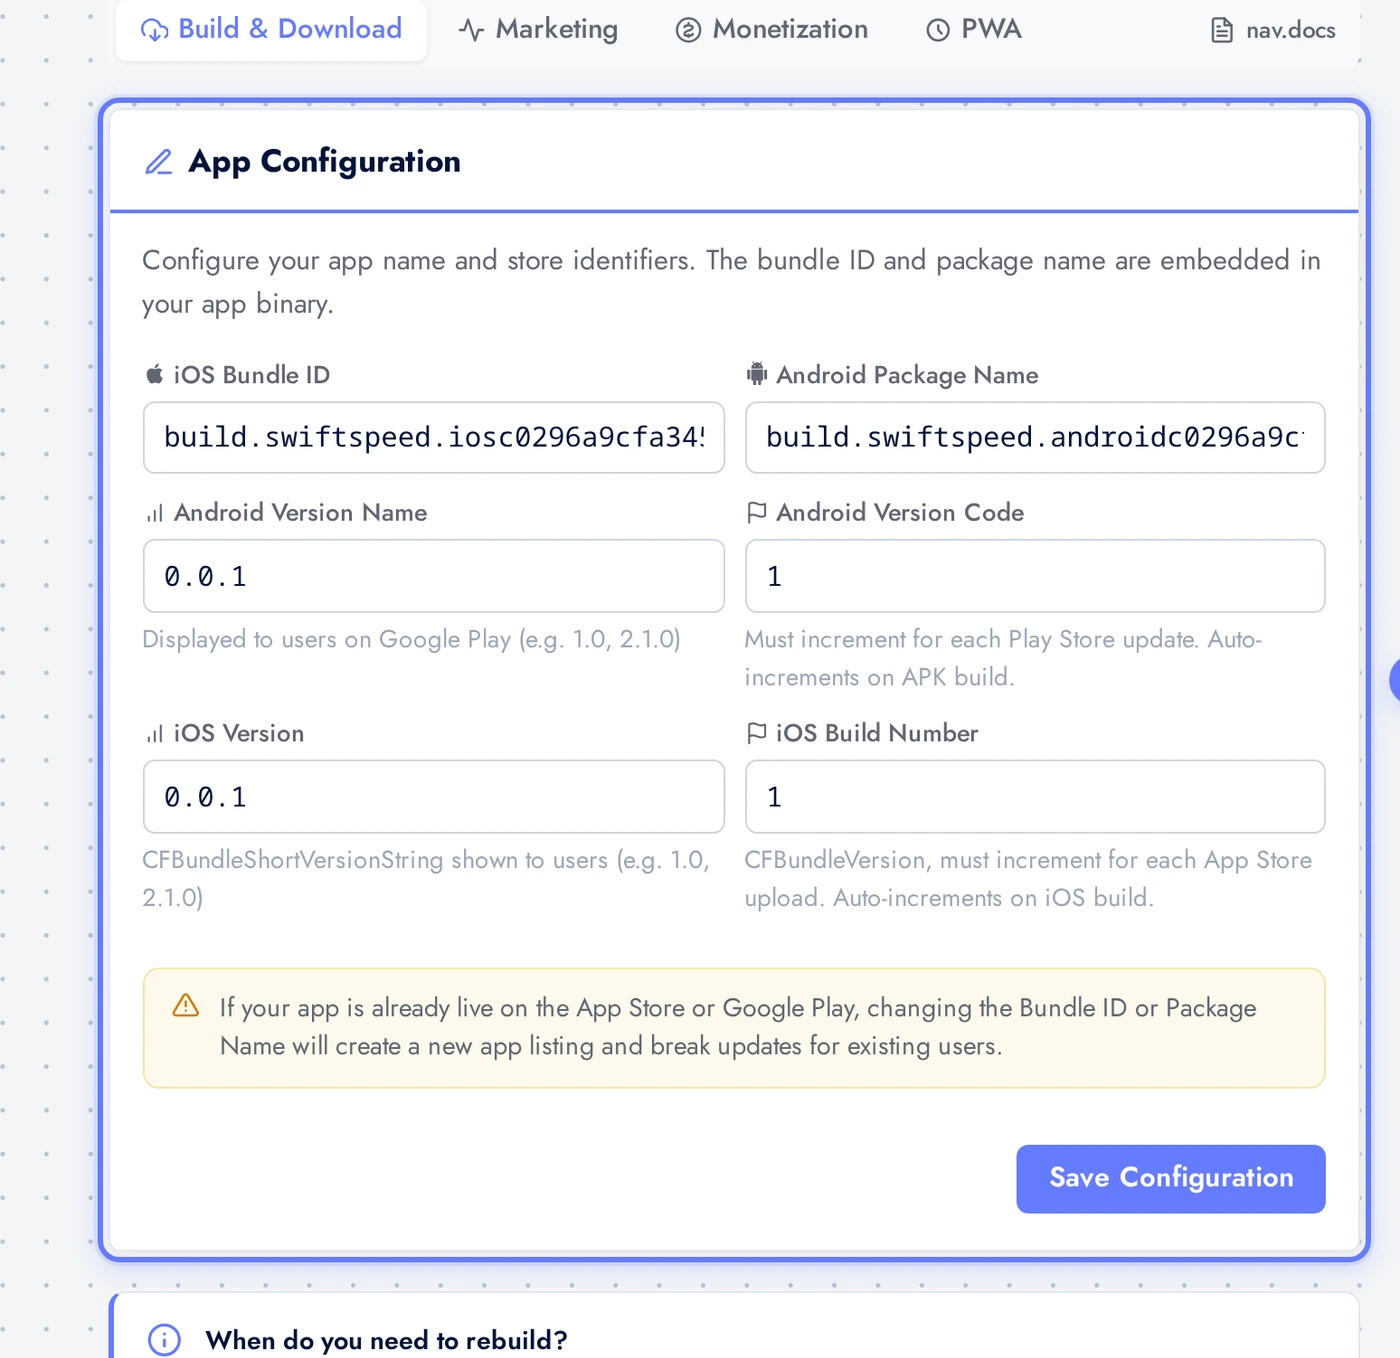
Scroll to the iOS build card and click Generate Source Code. The cloud build server packages the Capacitor workspace into a ZIP. Status flow: Queued (a few seconds) > Building (3 to 8 minutes) > Success.
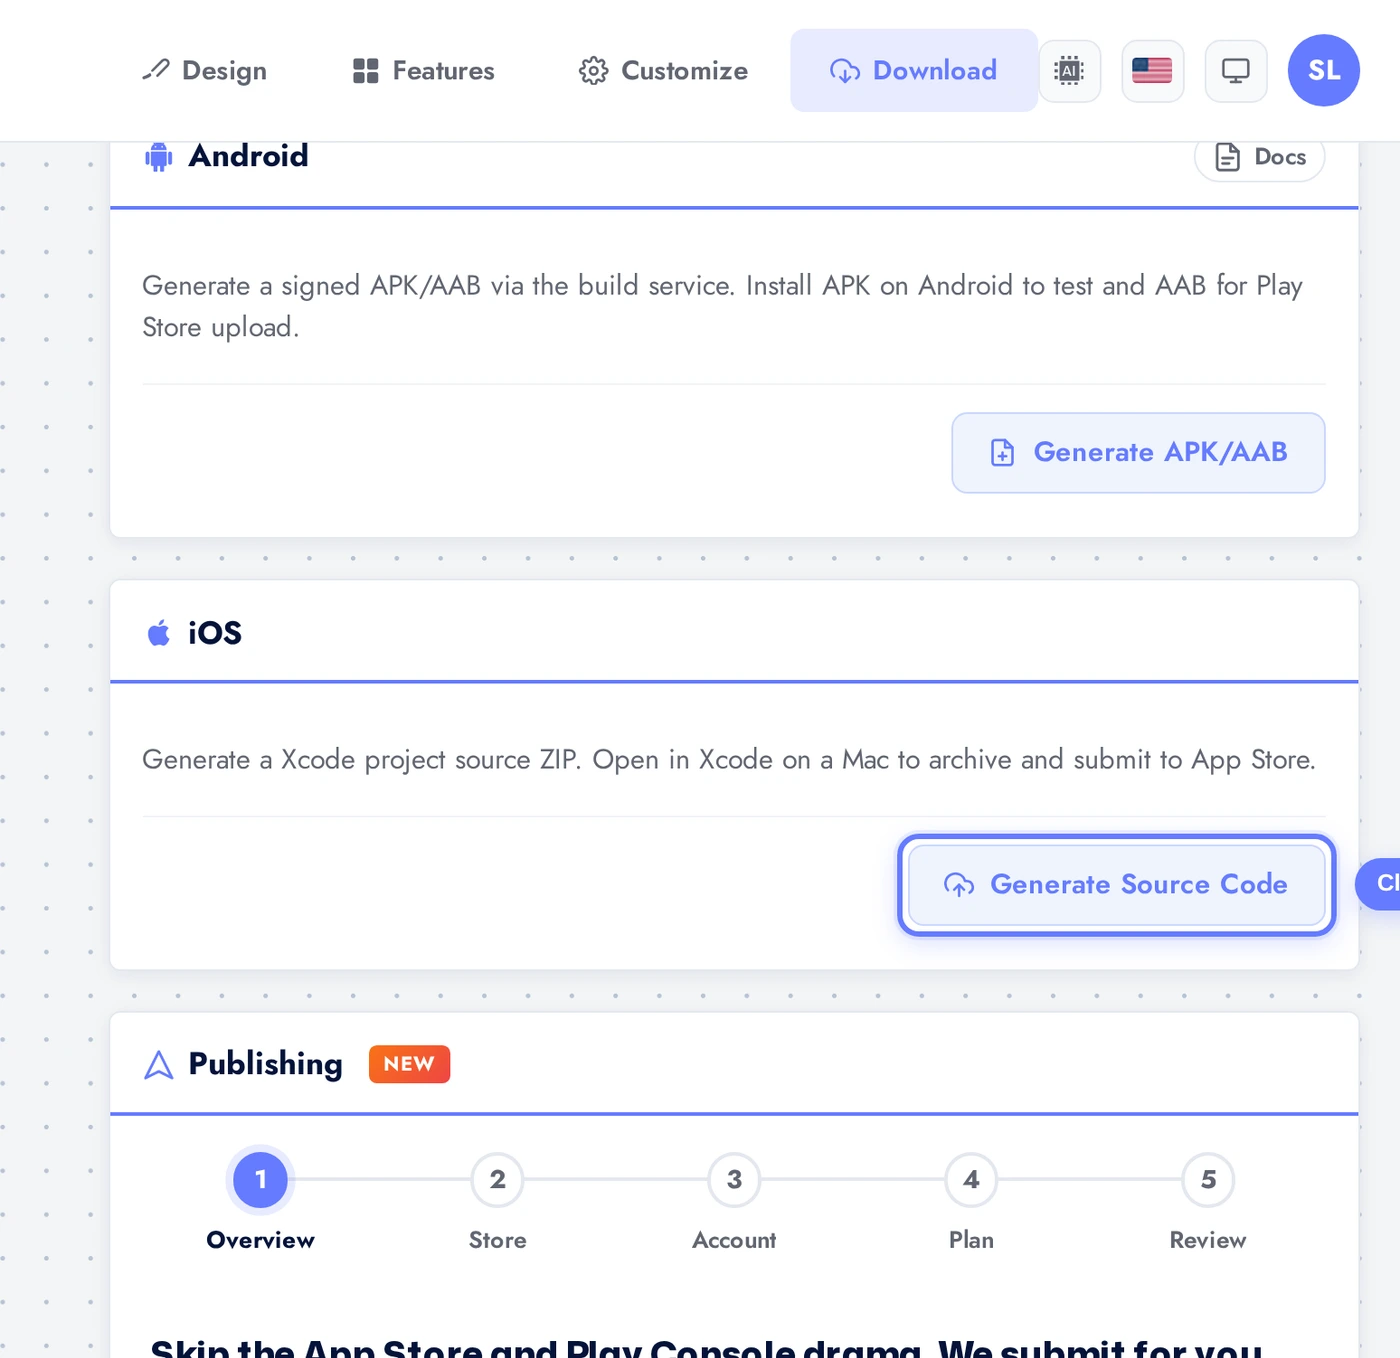
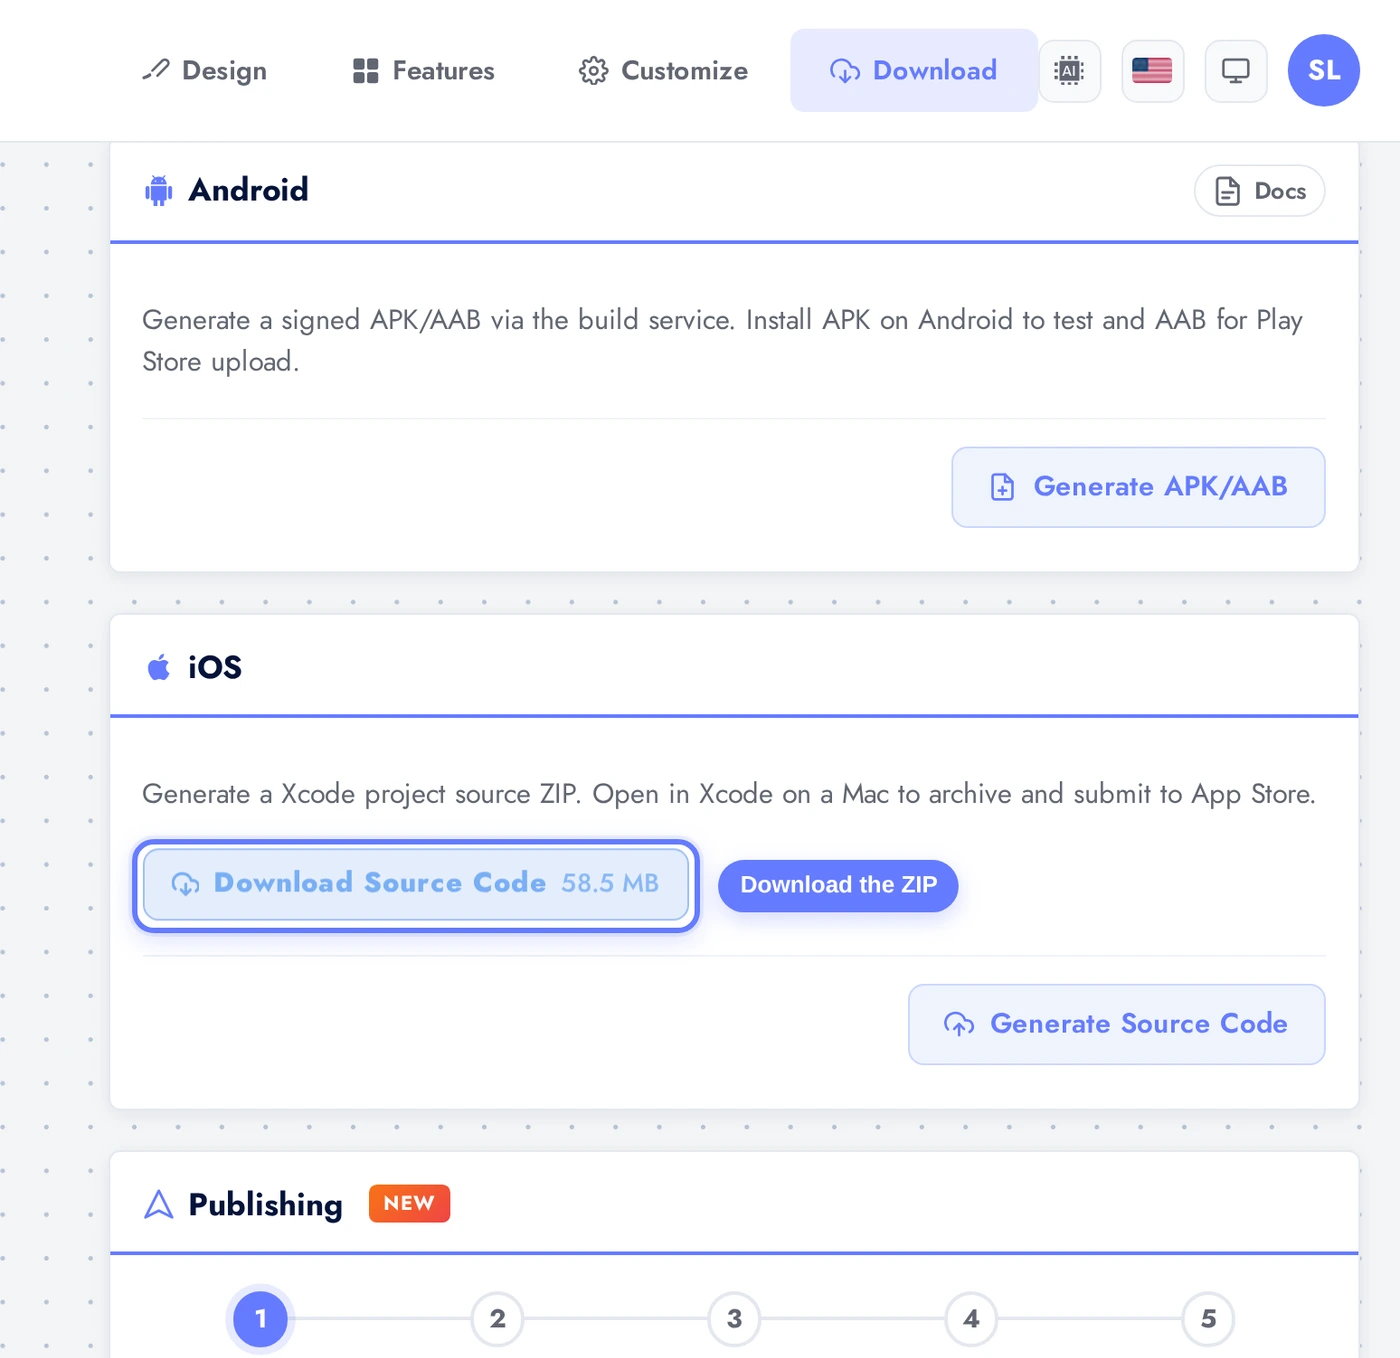
When the build finishes, the Generate button is replaced by a Download Source Code pill (typically 30 to 80 MB). Click it to get the ZIP. Save it somewhere you can find again, you are about to unzip it on your Mac.
Opening the Project in Xcode
Unzip the file on your Mac. You will see a folder containing
App.xcworkspaceand a siblingAppdirectory.
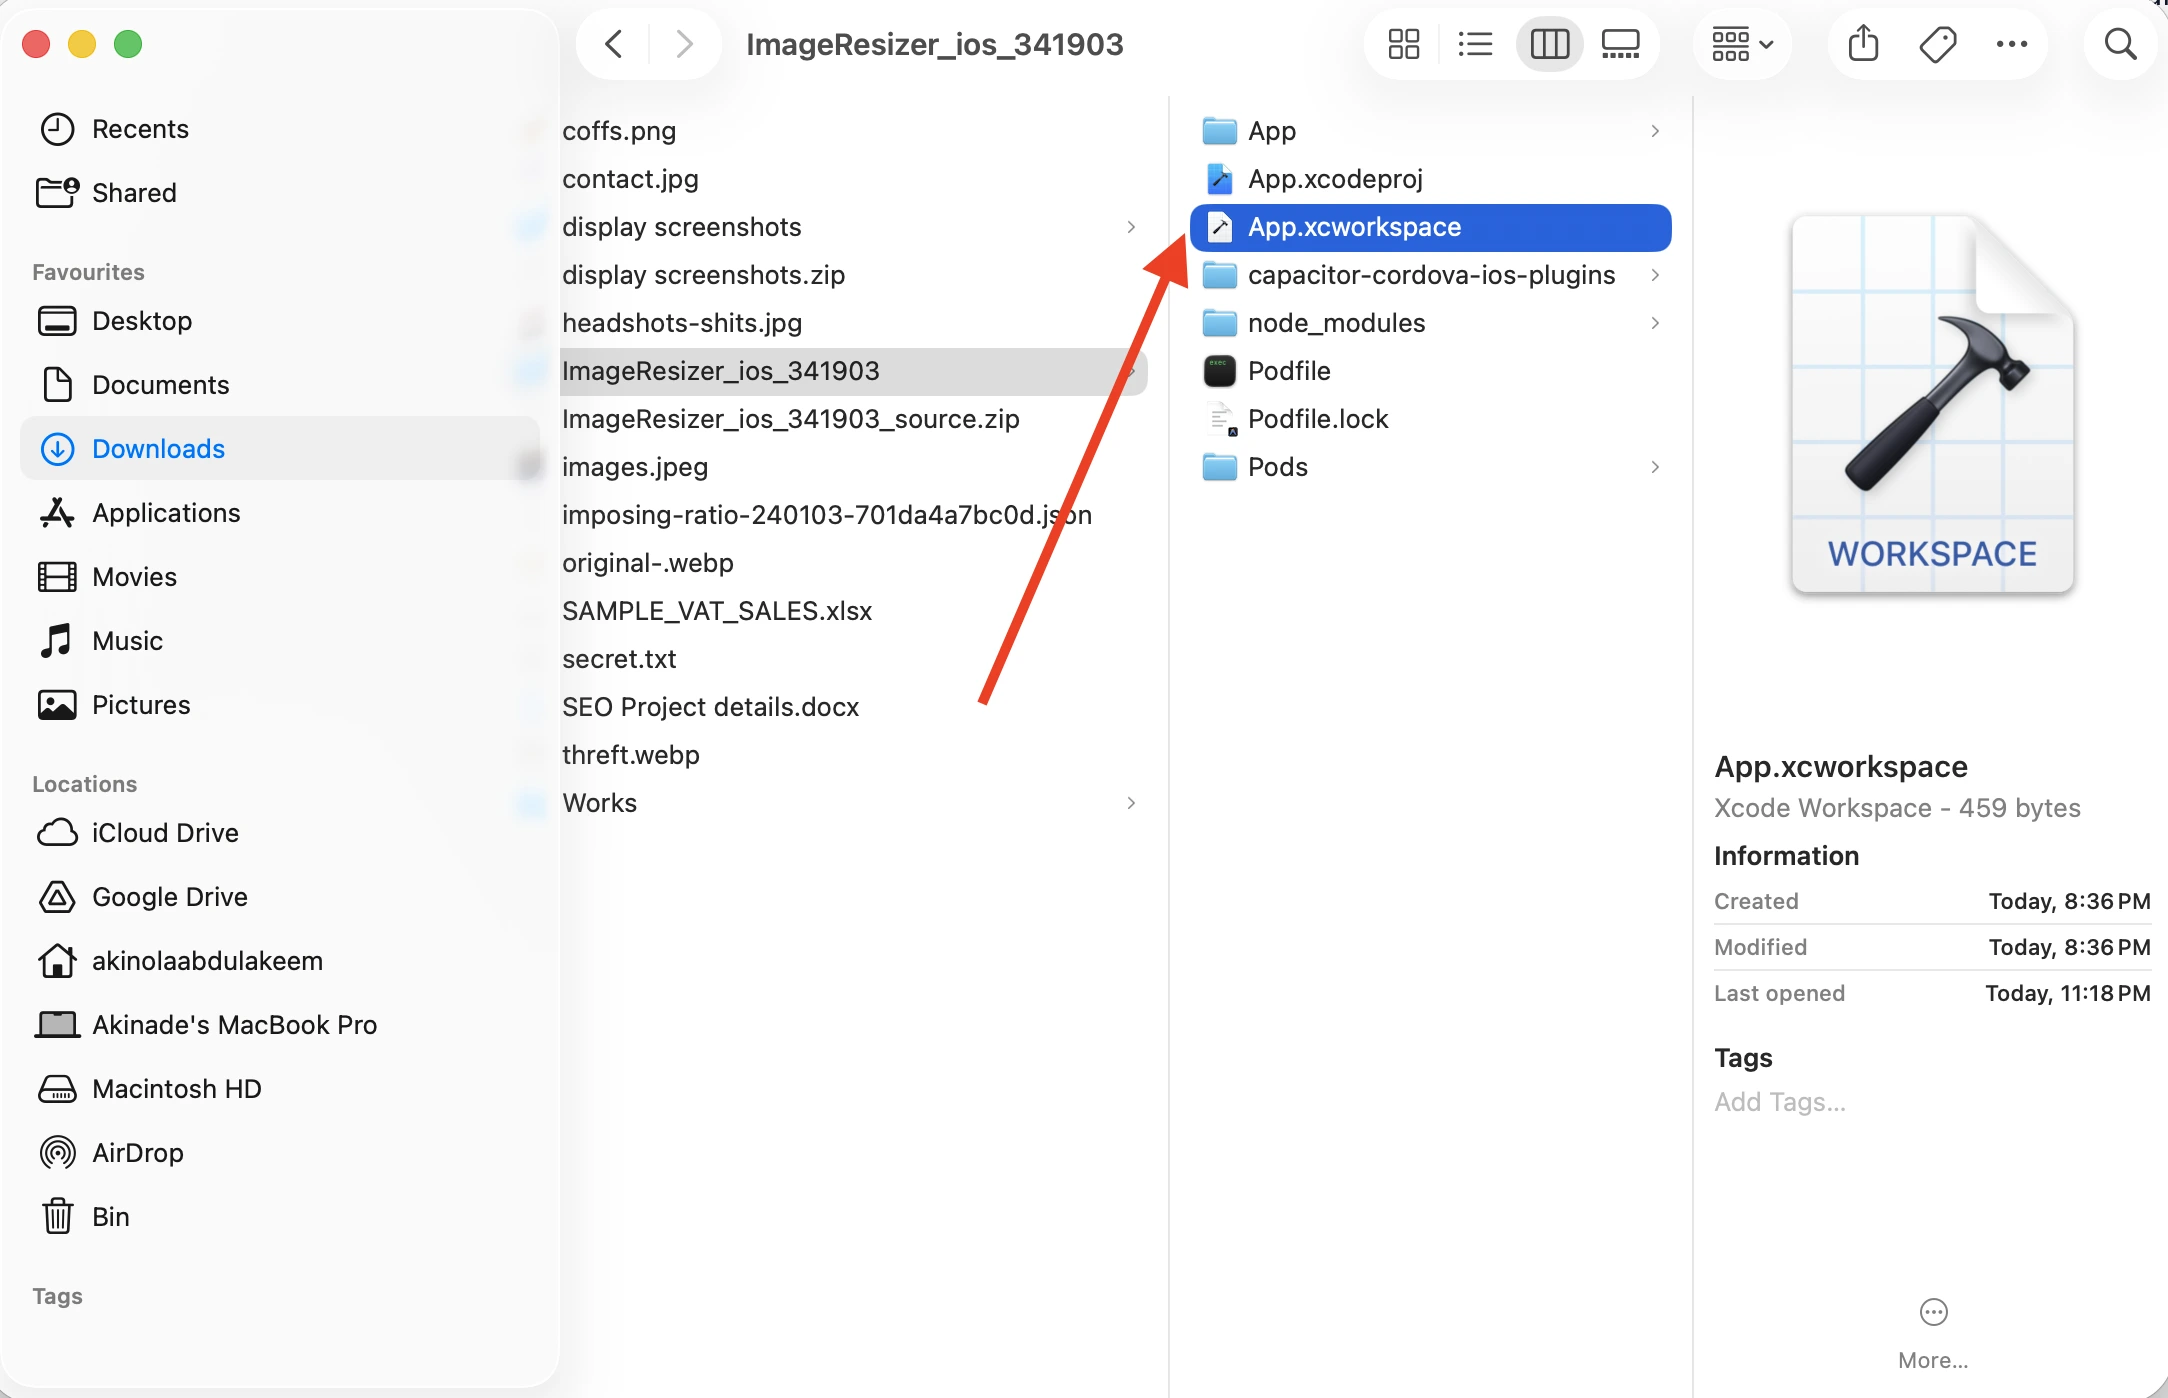
Always open the
.xcworkspacefile, NOT the.xcodeproj. The workspace pulls in the CocoaPods Capacitor dependencies. Opening just the project breaks the build.Wait for Xcode to finish indexing (status bar at the top says "Indexing"). First open takes 60 to 180 seconds.
Signing with Your Apple Developer Account
This is the step that trips up most first-time publishers. The app must be signed with a certificate tied to your Apple Developer account; the certificate is what tells Apple "yes, this developer is allowed to ship this bundle ID".
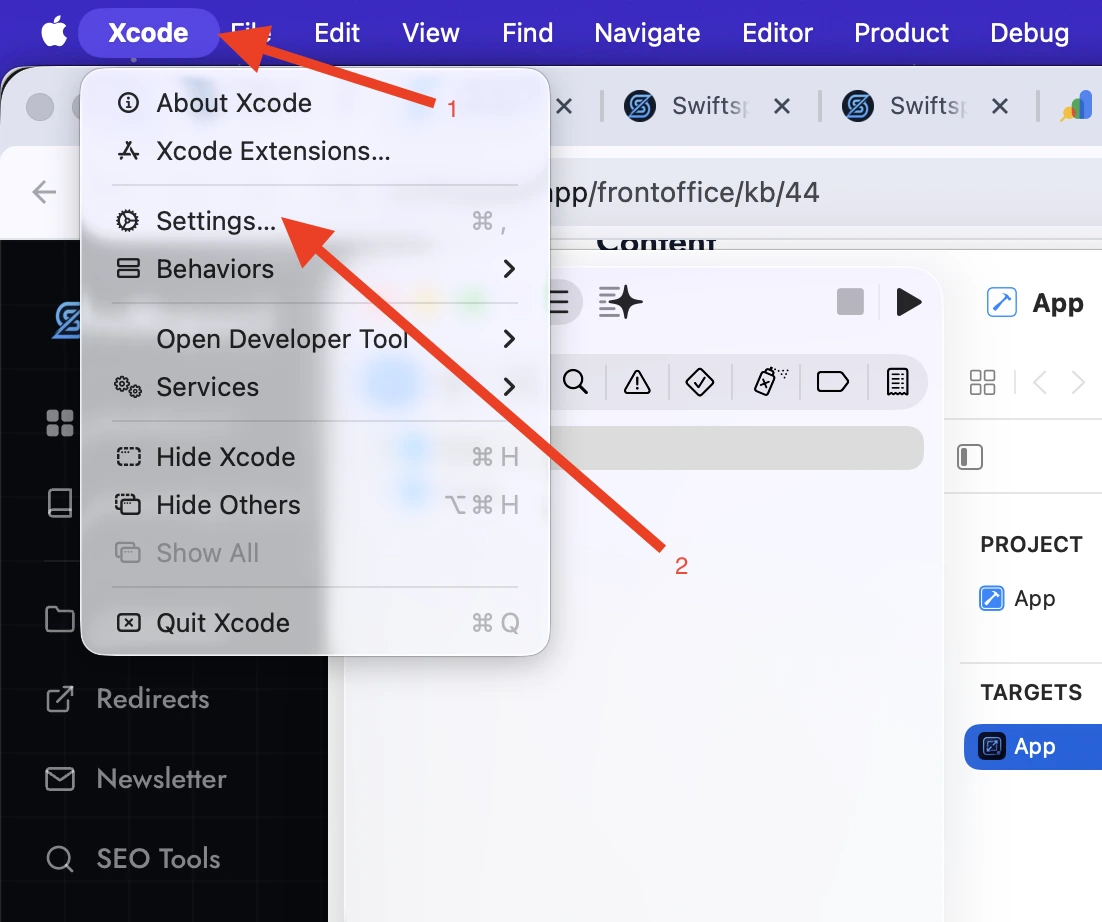
To Sign in Select Xcode at the top, click settings and click add Apple account to add your apple account
In Xcode, select the App target from the left sidebar (the blue icon at the top).
Click the Signing and Capabilities tab.
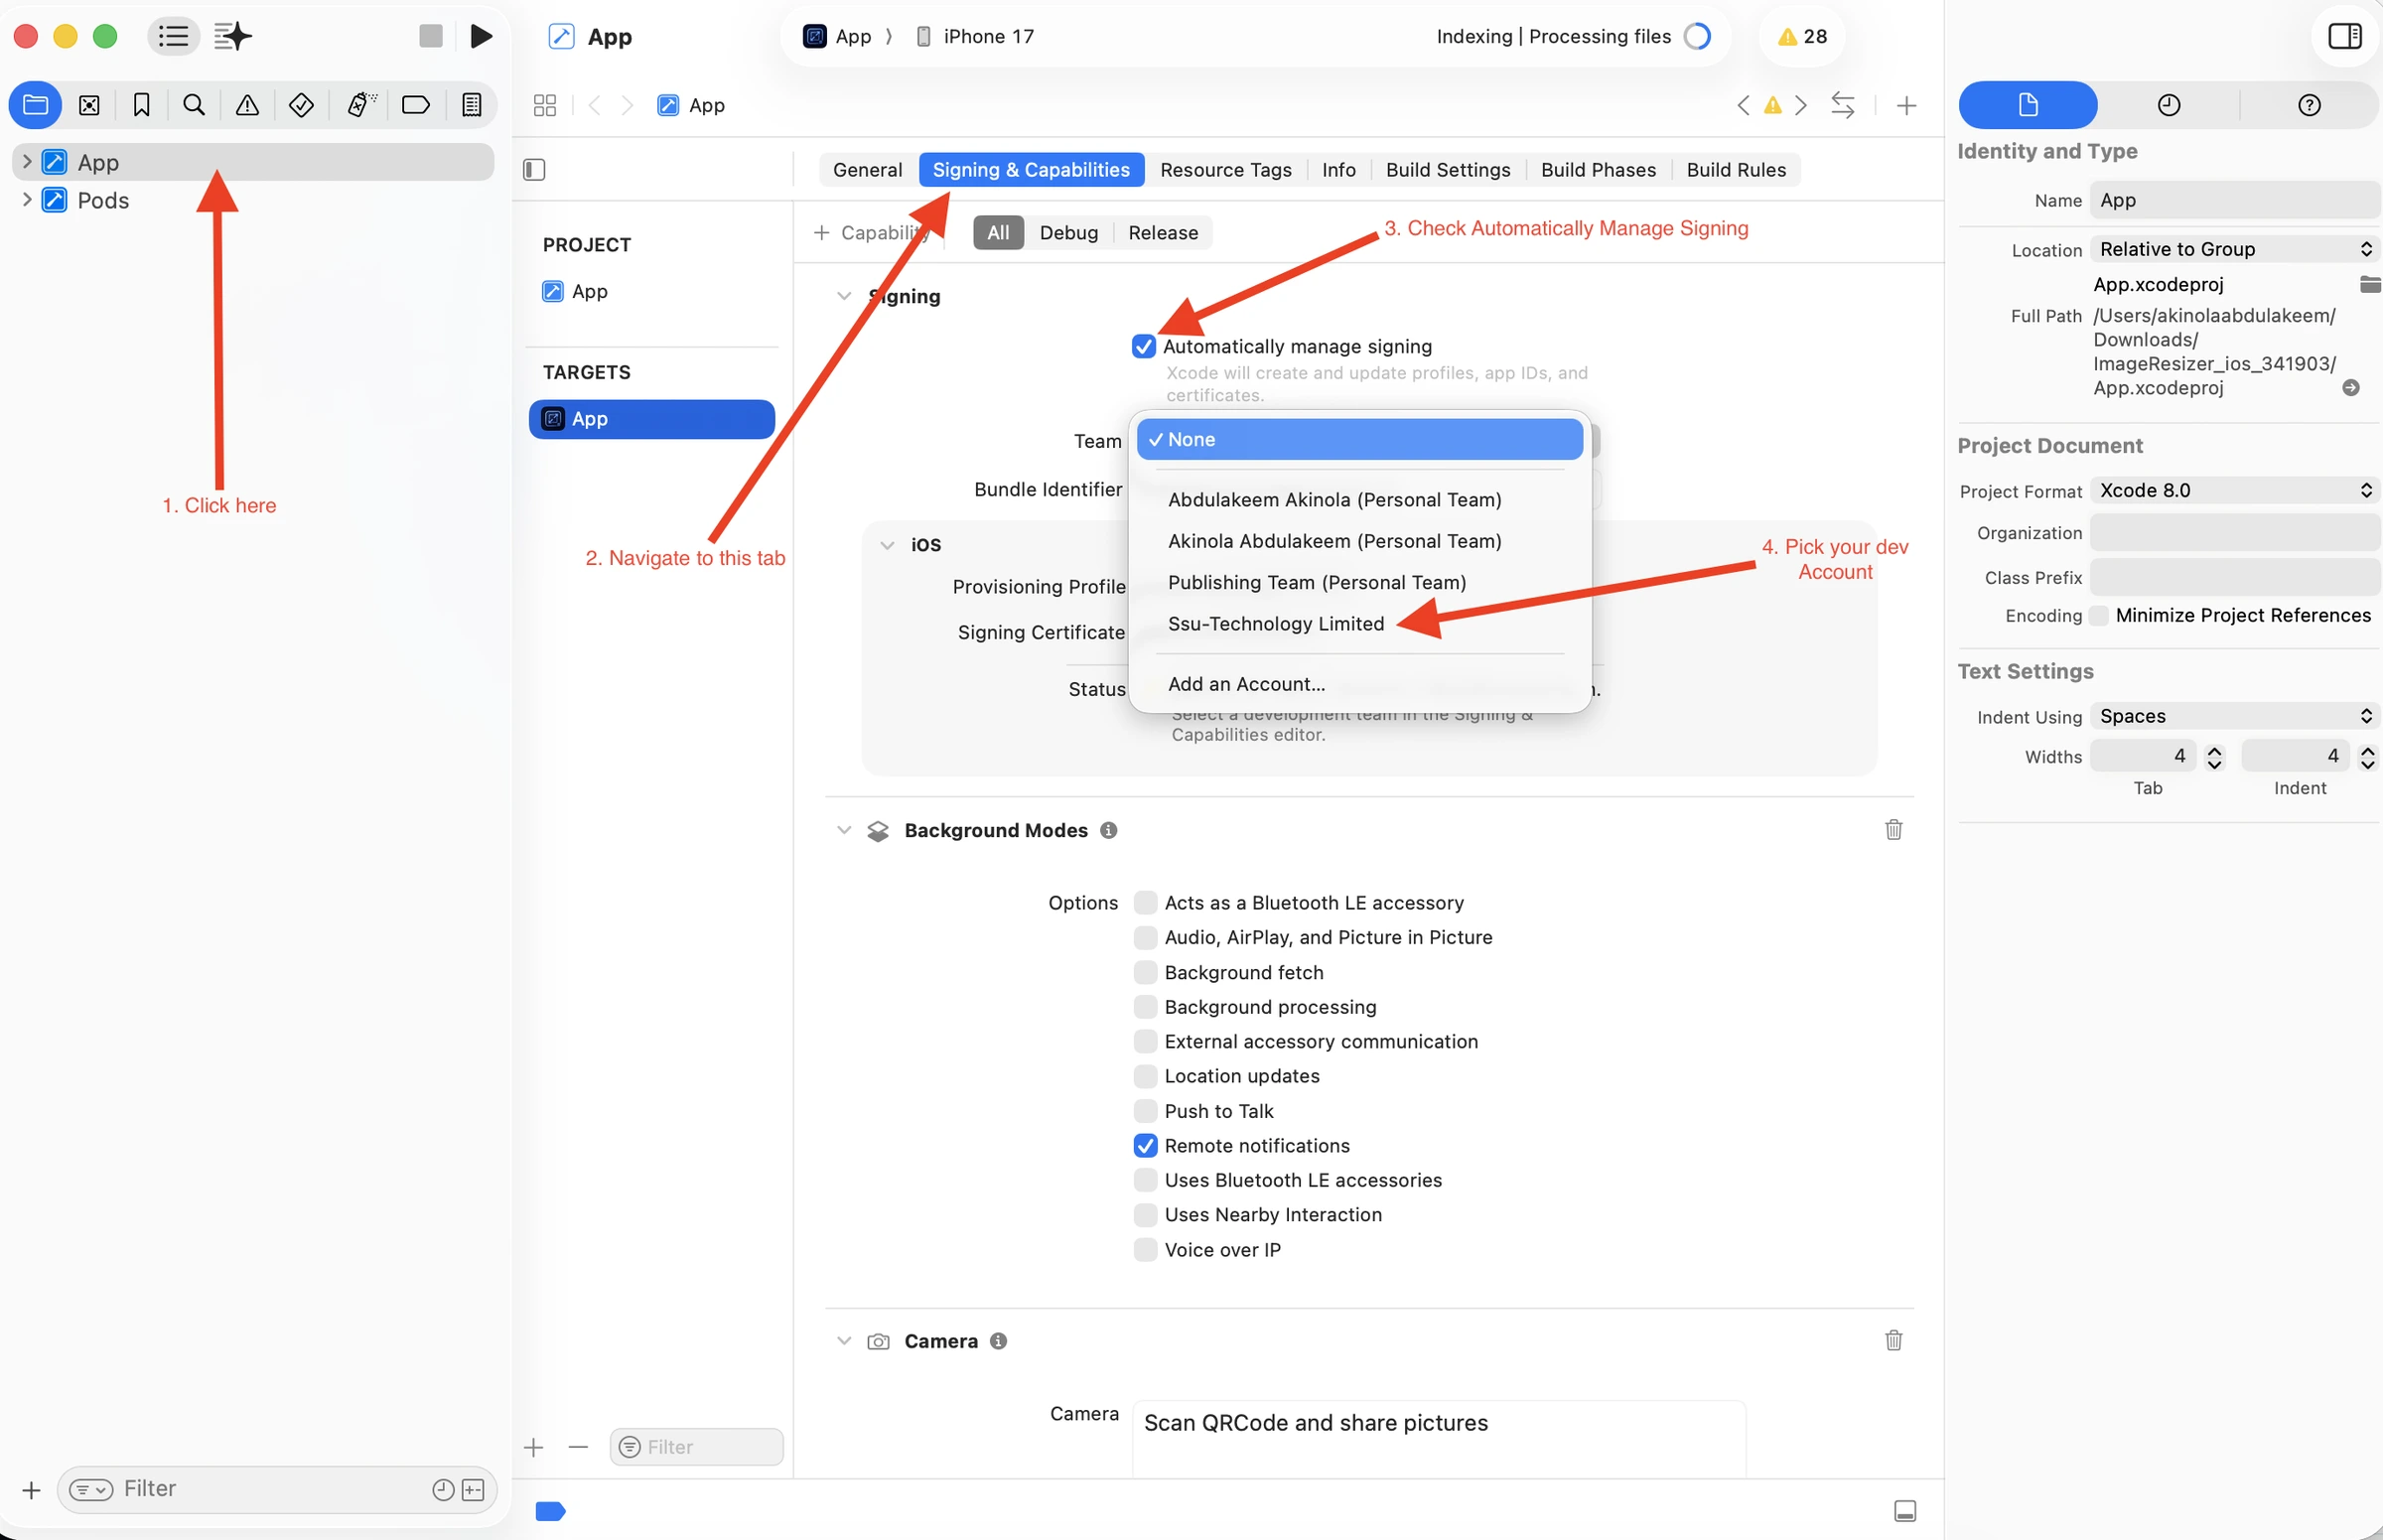
Tick Automatically manage signing. This is the easiest path for a first release.
In the Team dropdown, pick your Apple Developer team. If your team is not listed, click Add an Account... and sign in with the Apple ID associated with your developer enrollment.
Bundle Identifier: confirm it matches what you set in Swiftspeed. Apple will generate a new App ID for this bundle ID inside your developer account the first time you build.
If you see a red warning ("Failed to register bundle identifier", "Provisioning profile not eligible", etc.), Xcode usually offers a Try Again button or a Register Bundle ID button. Click it. Xcode talks to Apple for you.
Upgrading an existing app: pick the SAME team and SAME bundle ID as the previous version. Xcode reuses the existing App ID and provisioning profile. Do not change the bundle ID, doing so creates a new app in App Store Connect and existing users do not get the update.
Archiving the Build
Top bar of Xcode: change the run destination from a simulator to Any iOS Device (arm64). You cannot archive against a simulator target, it must be a device target.
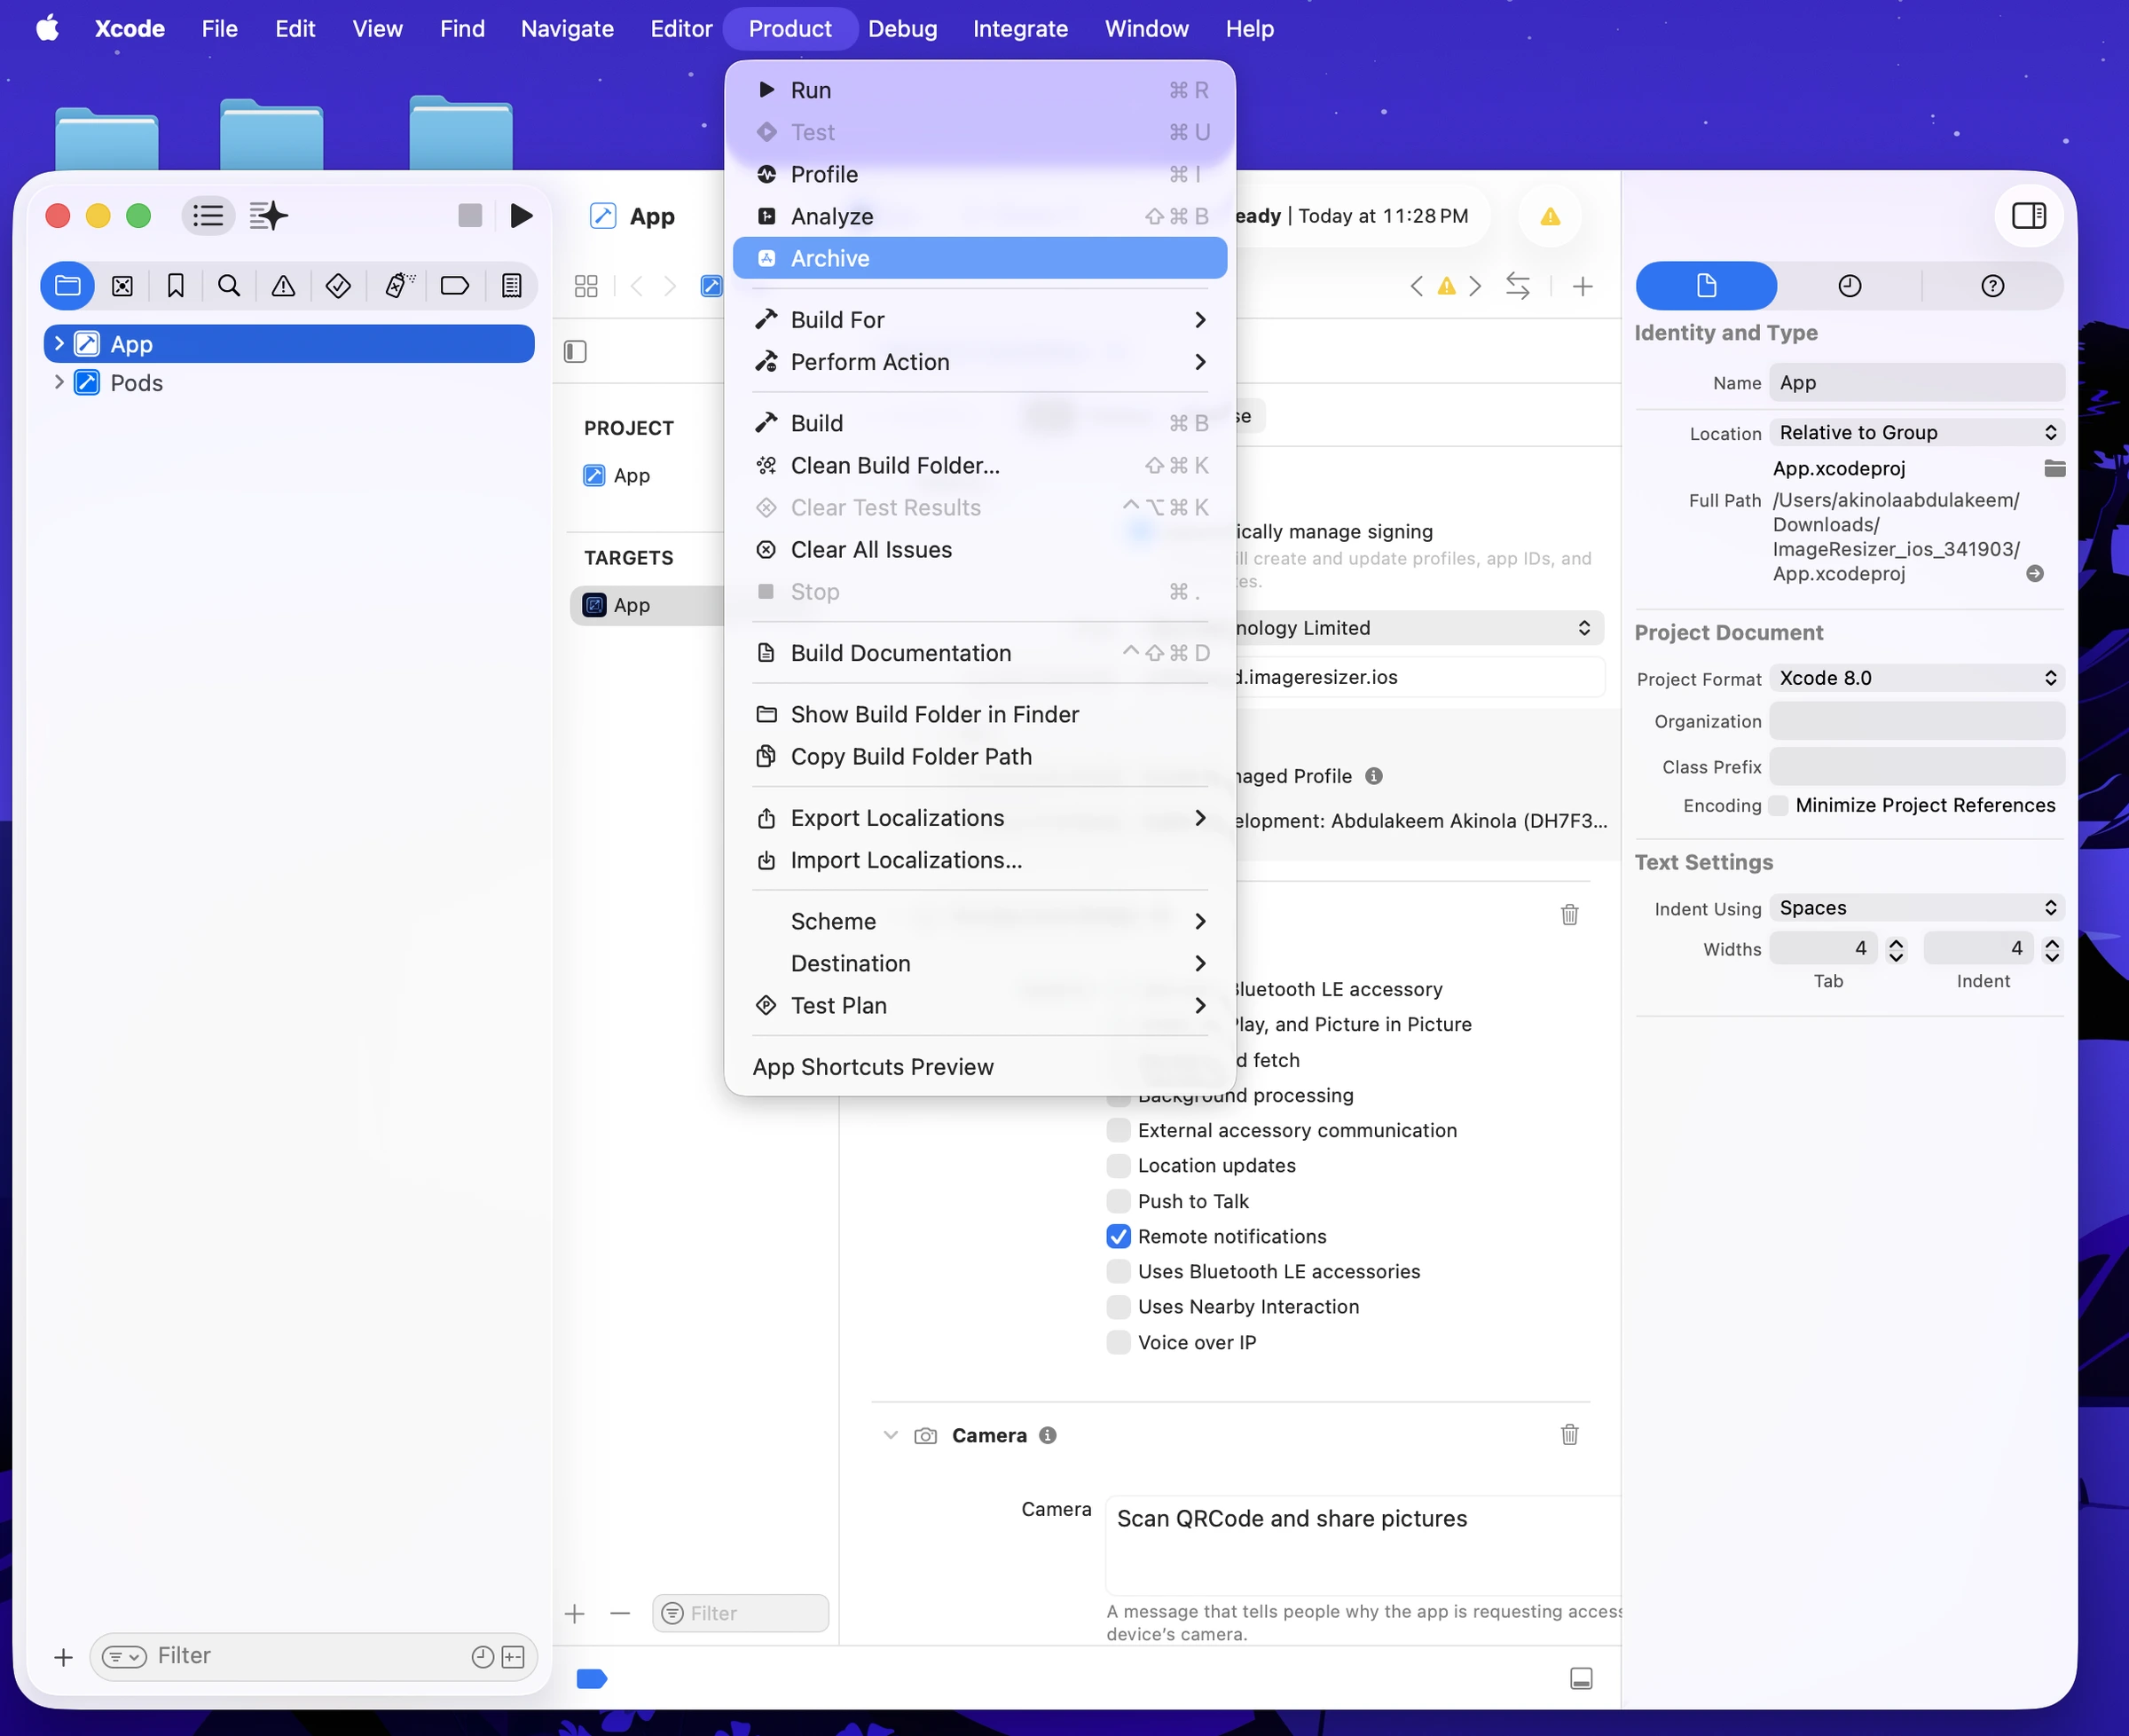
Menu: Product > Archive. The status bar shows compilation progress. First archive takes 3 to 10 minutes depending on your Mac.
When the archive finishes, the Organizer window opens automatically with the new archive selected. If it does not, open it from Window > Organizer.
If the archive fails: read the red error in the issue navigator (left sidebar > triangle warning icon). 90% of failures are signing-related, fix the team / bundle ID / provisioning profile and try again.
Distributing to App Store Connect
In the Organizer window, with your new archive selected, click Distribute App (top-right).
Pick App Store Connect, click Next.
Pick Upload, click Next.
Accept the default signing options. Xcode uploads the IPA to Apple.
Upload typically takes 2 to 8 minutes for a Swiftspeed Capacitor app. When done, you see Upload Successful with a green checkmark. Close the dialog.
Apple now needs to process the build. This happens server-side and takes another 5 to 30 minutes after the upload completes. You will get an email from Apple ("App processed") when it is ready, OR you can refresh the App Store Connect Builds page to check.
Verifying the Build in App Store Connect
Open App Store Connect in your browser, sign in, click My Apps, click your app. If this is your first version, you may need to create the app in ASC first (click the + button on My Apps > pick New App > fill in name, language, bundle ID, SKU). Otherwise, jump straight to TestFlight > Builds.
The TestFlight > Builds page lists every IPA Xcode has uploaded for this app. A fresh upload appears here as Processing for 5 to 30 minutes, then flips to Ready to Submit. Once the chip says Ready, you can attach the build to a version on the App Store side.
Filling in the Version Metadata
In the App Store Connect sidebar, under iOS App, click the version you want to ship (e.g. 1.0 Prepare for Submission). This is where you attach the build, write the listing copy, and upload screenshots.
The Prepare for Submission page has three blocks you fill in: - Build - click the + next to "Build" and pick the IPA that just finished processing. - What's New in This Version - short release notes (max 4000 chars). For first release, just "Initial release" or a one-line product pitch. - Screenshots - minimum 2, maximum 10 per device size. 6.7-inch iPhone is the only mandatory size; the others are optional but recommended. Use the Swiftspeed Screenshot Mockup tool linked below to generate them in 30 seconds each.
Promotional Text (170 chars, optional): shown above the description on the App Store listing. Updates without re-submission, so use it for short-term offers ("Sale ends Friday").
Description (4000 chars, required): the long-form pitch. First three lines are what shows above the fold. Lead with the value proposition, not your company name.
Keywords (100 chars total, required): comma-separated. Do NOT repeat words. Do NOT include your app name (Apple auto-indexes it). Do NOT use trademarked terms you do not own.
Support URL (required): a public page where users can get help. Your contact page or your privacy policy page works. Apple rejects placeholder URLs.
Marketing URL (optional): your app landing page if you have one.
Copyright (required): "2026 Your Brand Name" format. No HTML, no special characters.
Sign-in Information (required if your app has a login screen): give Apple a demo account so reviewers can get past the login. They will reject the app if the reviewer cannot log in.
App Information and App Privacy
Two sidebar items on the left (General > App Information, and General > App Privacy) need to be completed once per app, not per version.
The App Information page is filled in once per app. Bundle ID is locked after first submission, so triple-check it matches what you signed with in Xcode. Primary Category is shown on your App Store listing and affects ranking; pick the most specific category that fits.
Privacy Policy URL (App Information): paste the URL Swiftspeed generates at Settings > Privacy Policy. Apple rejects every submission without one.
Bundle ID: locked after first submission. If you ever need to change it, you create a new app in App Store Connect and lose existing users.
Primary Category: drives discovery. Pick the most specific match (e.g. "Photo and Video" instead of "Utilities" if you do image editing).
App Privacy form: declare every data type your app collects. If your app uses Customer Account: declare "Contact Info" (email, name). If it uses push notifications: declare "Identifiers" (device ID). If it has analytics: declare "Usage Data". Be honest, Apple audits.
Submitting for Review
On the Prepare for Submission page, scroll to the top. The Add for Review button is in the top-right corner.
Apple asks two final questions: Export Compliance (does your app use encryption beyond HTTPS? for most Swiftspeed apps the answer is No) and Content Rights (does the app contain third-party content you have rights to use? Yes if you have your own content, No otherwise).
Click Add for Review, then Submit to App Review on the confirmation page.
Status changes to Waiting for Review. Apple's queue clears in 24 to 72 hours for most apps (faster recently). First submissions sometimes take longer.
You can leave App Review > App Review Information with a contact phone and email so Apple can reach you if reviewers have questions. Worth filling in for first submissions.
Common Rejections and Fixes
Guideline 2.1 - Performance: Information Needed. Apple cannot get past your login screen. Provide a demo account in App Review Information > Sign-In Information and resubmit.
Guideline 5.1.1 - Privacy. Either your privacy policy URL is unreachable, or the policy does not mention a data type your App Privacy form declares. Re-check the URL, re-read the policy, fix and resubmit.
Guideline 4.0 - Design. Often "the app is mostly a webview". For Swiftspeed apps, this rarely fires because the editor wraps native UI shells, but if you have a single-page WordPress-style app, Apple may flag it. Add at least one native-feeling tab (booking, push, e-commerce) before submitting.
Guideline 3.1.1 - Payments. If your app sells digital goods, Apple requires their in-app-purchase system. You cannot use Stripe or Paystack for digital goods (physical goods are fine). Swiftspeed's monetization tab supports both worlds correctly; just make sure you picked the right one for what you sell.
Missing or invalid screenshots. Apple is strict about dimensions and content. Use the Screenshot Mockup tool below to generate the exact dimensions, no cropping, no rounded corners.
Trademark in keywords. Cannot use "Facebook" or "TikTok" in keywords unless you own those marks. Replace with generic equivalents ("social network", "short video").
After Approval
Once Apple approves, the version moves to Pending Developer Release (if you set "Manually release this version") OR Ready for Sale (if you set "Automatically release"). For first launches we recommend manual release so you control the timing.
Live on the App Store: 2 to 24 hours after release. Apple's CDN propagation is uneven, your link may work in some countries before others.
Reply to App Store reviews. Apple's ranking algorithm rewards developer engagement. A "thanks for the feedback" within 48 hours moves the needle, especially for 3 to 4 star reviews.
Watch the App Store Connect > Analytics page for the first week. Spike in crashes (Crash data) or 1-star reviews means there is a bug; push a 1.0.1 hotfix the same day.
Update at a steady cadence. Apple rewards apps that ship regularly. One update every 2 to 4 weeks is the sweet spot even if it's only minor copy or asset changes.
Asset Generators (Speed Up the Listing)
Screenshot Mockup Generator: drop in a screenshot from your app, pick an iPhone frame, add a caption overlay, download in the exact App Store dimensions (6.7-inch and 6.5-inch). Each screenshot takes about 30 seconds. Ten screenshots in 5 minutes.
App Icon Generator: upload a square logomark (256x256 or larger), pick full-bleed or rounded corners (Apple rounds them anyway, so leave full-bleed), download in every iOS density including the 1024x1024 App Store icon.
Both tools are free, no sign-up. Use them before you start filling in App Store Connect so the listing has finished assets, not placeholders.
Tips
Use TestFlight before the App Store. From the same uploaded build, you can invite up to 10,000 testers via TestFlight without going through App Review. Catches crashes before paying customers see them.
Keep your Apple Developer Program enrollment active. $99 / year, auto-renewal. If you let it lapse, your app gets removed from the App Store within a few weeks.
Localise the listing for your top markets. Listings in French / Spanish / Portuguese / Japanese convert 2 to 5x better in those markets than English-only listings. ASC > Localizations tab.
Promo videos increase conversion 20%+. A 15 to 30 second screen recording with captions, hosted in App Store Connect (not YouTube). Apple supports up to three preview videos per device size.
Keep submitting. Most apps get rejected once or twice on the way to live. Read Apple's rejection email carefully, fix the specific issue, resubmit. The same reviewer usually picks it back up within 24 hours.