1-Click Publishing - Let Swiftspeed Publish Your App
What 1-Click Publishing Is
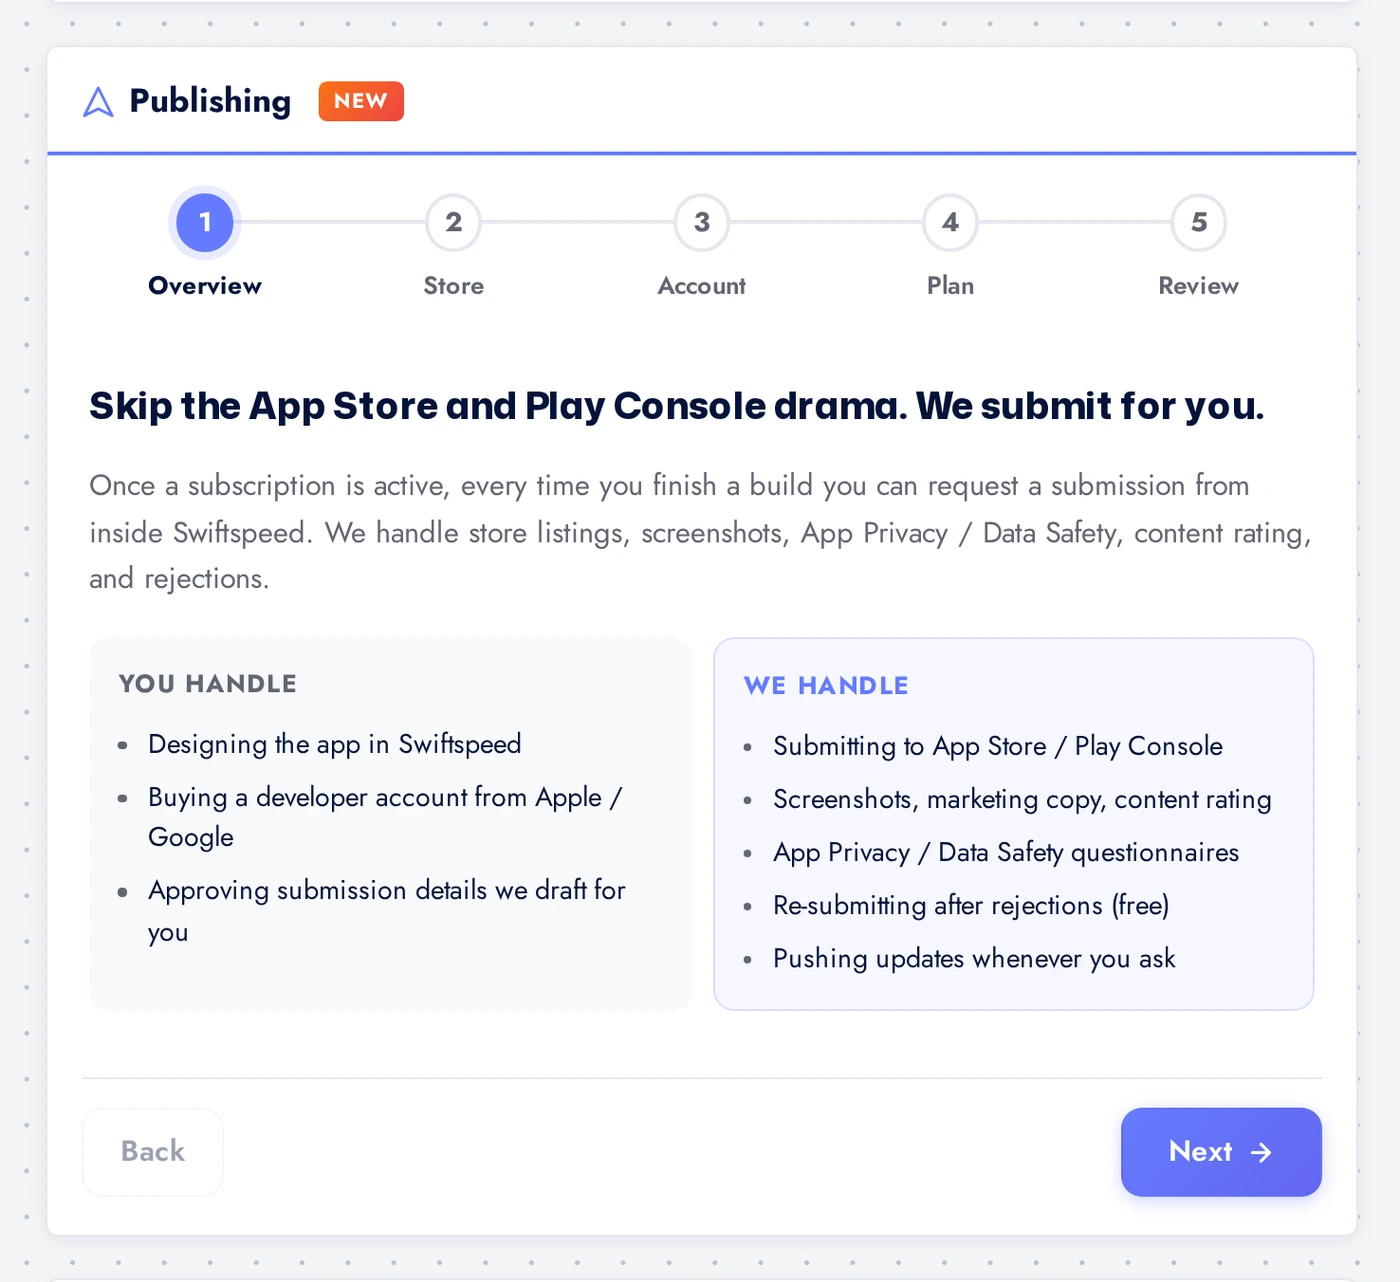
1-Click Publishing is a fully automated service that takes your Swiftspeed-built app and submits it to the App Store and Google Play on your behalf. No Xcode, no Play Console, no manual uploads, no archive dialogs, no signing certificate juggling.
You invite us to your Apple Developer team (or Google Play developer account) once. From that point on, every time you want to ship an update you click Start publishing in the editor and we do the rest: build the artefact, sign it, upload it, fill in release notes, submit to the store. You watch the status from inside the editor and get notified the moment it goes live.
This is what 1-Click Publishing handles for you:
Signing certificates and provisioning profiles (iOS) - we generate, manage, and renew them inside your Apple Developer account.
Keystore signing (Android) - we own the keystore for your app on Swiftspeed and use it for every build.
Building the artefact - IPA for iOS, AAB or APK for Android, including legacy APK-only apps that were on Play before Play App Signing was mandatory.
Upload to the store - fastlane pilot for iOS, Play Developer API for Android. Both run on our infrastructure.
Version bumping - we pick the next versionCode and versionName so you never collide with an existing release.
Submission for review - metadata, release notes, screenshots, content rating declarations.
Rejection rebuilds - if Apple or Google rejects, we read the rejection, rebuild from your latest editor state, and re-submit. You see what happened in the status drawer.
Going-live detection - we watch the Play Store and App Store Connect APIs in the background and flip the status to Live the moment your release ships to end users.
How It Compares to Self-Publishing
Both routes get the same app onto the same stores. Picking the right one is mostly about how much of your time you want to spend on the submission machinery.
Self-publishing iOS - You download the Xcode source from the editor, open it on a Mac, sign with your Apple Developer team, run Product > Archive, distribute through the Organizer, then go to App Store Connect, attach the build, fill in metadata, submit for review. First time takes 2 to 4 hours including Xcode setup. Each future update is 30 to 60 minutes.
Self-publishing Android - You generate the AAB from the editor, go to Google Play Console, upload, fill the listing, submit. First time is around 1 to 2 hours. Each update is 15 to 30 minutes.
1-Click Publishing (both) - Setup takes 10 minutes once (invite Swiftspeed to your developer accounts). Every future submission is ONE click in the editor. We do everything else. Status flows in the editor in real time.
Cost - 1-Click Publishing is a per-app subscription (Standard or Unlimited tier, monthly or yearly). Self-publishing is free aside from the Apple Developer Program ($99 / year) and Google Play Console ($25 one-time) fees you pay either way.
Where to Find It
Open your app in the editor. Top bar > Download > App Info. Scroll down past the platform build cards. The Publishing card is the last one on that page.
The Publishing card lives on the Publish > App Info page in the editor. Two tabs at the top let you set up iOS and Android independently. Both can be active at the same time.
iOS Setup (Once Per App)
iOS setup is a four-step checklist inside the card. Each step unlocks the next. The whole thing takes about 5 to 10 minutes the first time, less if Apple already knows your team identity.
With iOS selected, the card shows four steps. Walk them top to bottom.
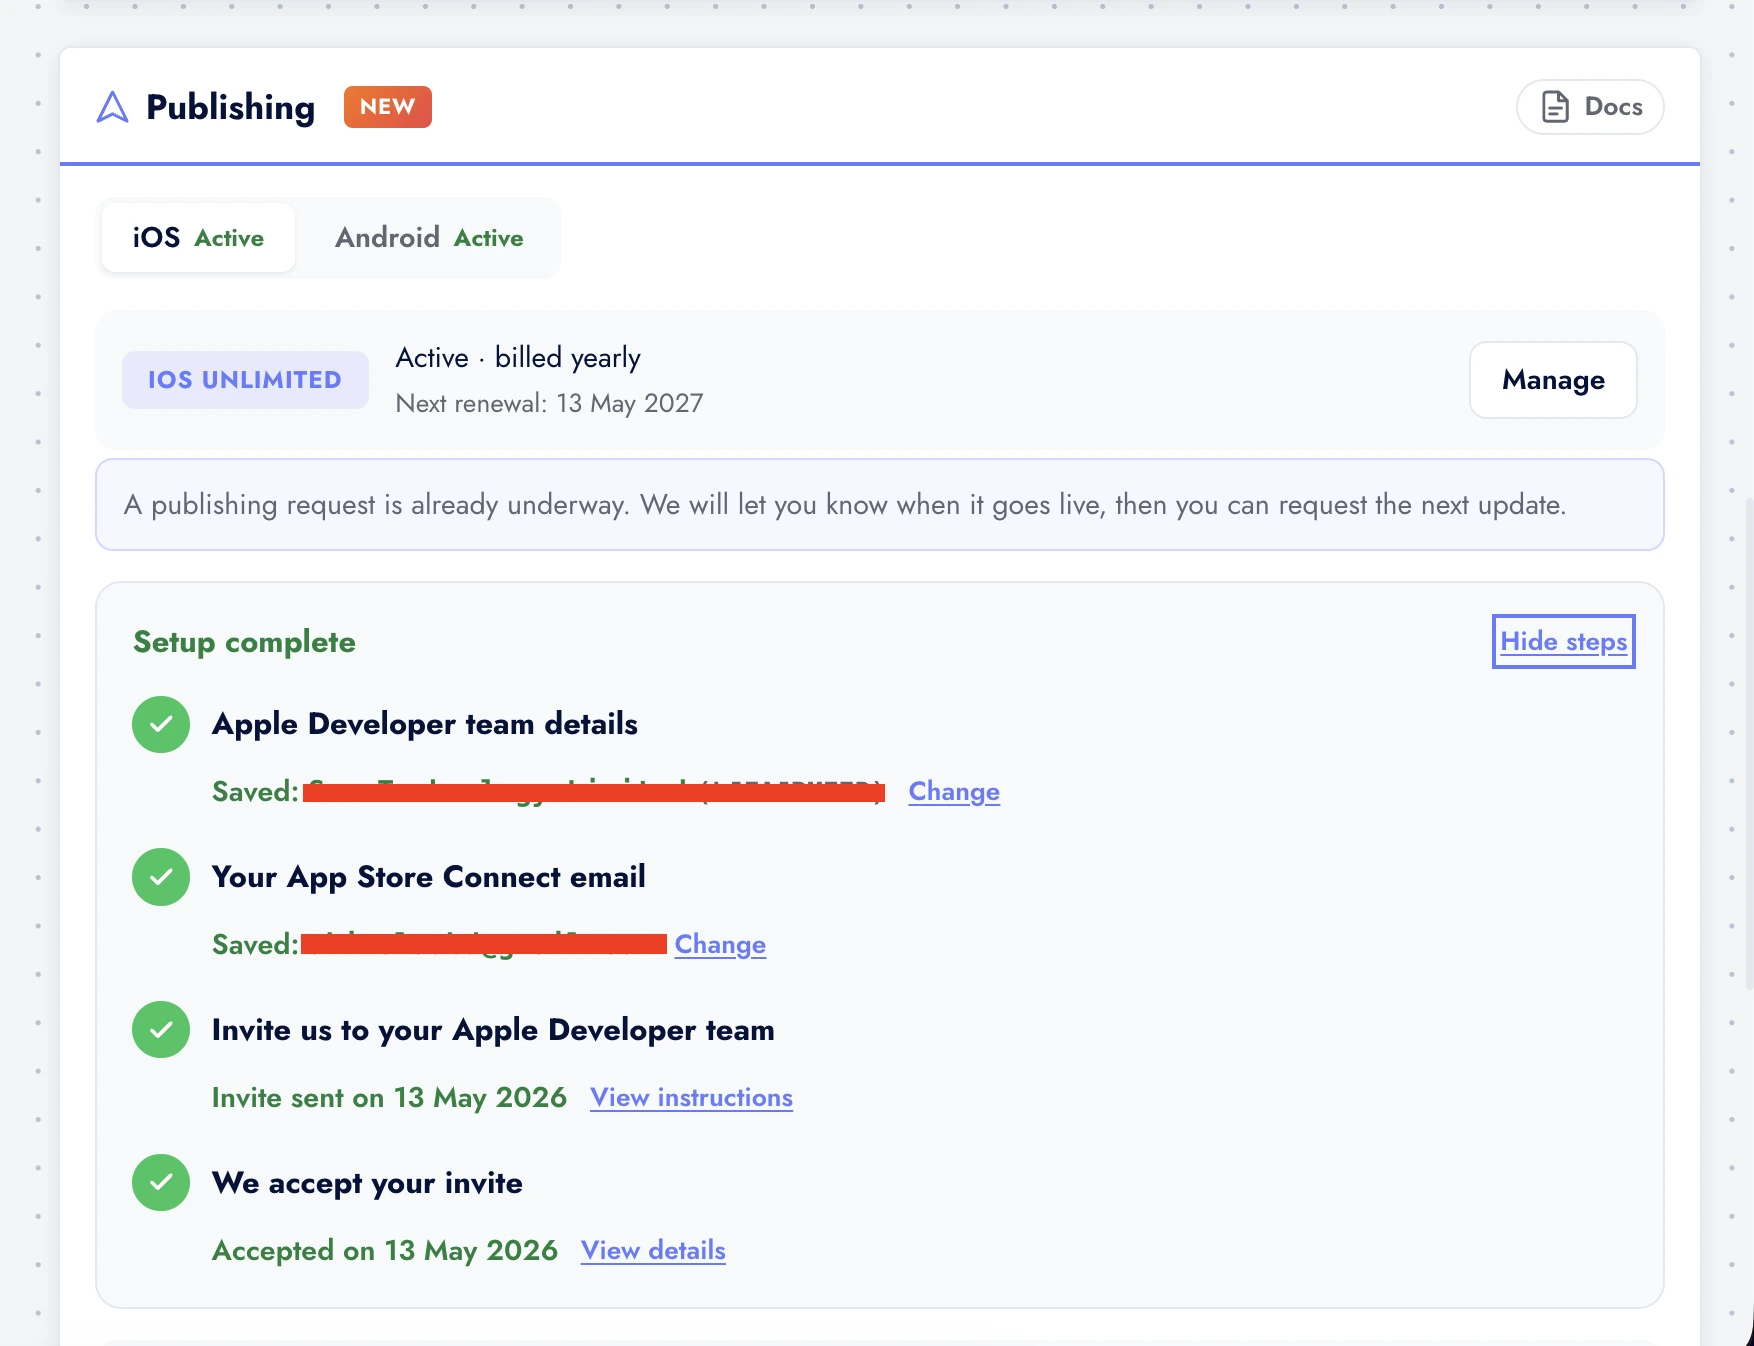
Step 1: Apple Developer team details. Paste your Apple Developer Team ID (the 10-character alphanumeric string from https://developer.apple.com/account, under Membership) and your team name. We need both to know which signing identity to use.
Step 2: Your App Store Connect email. The email you use to sign into App Store Connect. We use it to confirm when the invite is accepted, and it also serves as a fallback contact if Apple ever needs to reach the developer.
Step 3: Invite us to your Apple Developer team. The card gives you a checklist to follow inside App Store Connect: go to Users and Access, click Invite User, paste
publishing@swiftspeed.app, give us the Admin role (NOT App Manager - we need Admin to upload IPAs and configure submission metadata), select all apps. We click the link in the invite email to accept; the card flips this step to done automatically.Step 4: We accept the invite. The system polls Apple every few minutes for the invite acceptance. Once detected, the step is marked complete and the Start publishing button activates.
Android Setup (Once Per App)
Android setup is three steps, also one-time. Faster than iOS because Google does not require a separate team identity.
Switch to Android. Three steps this time.
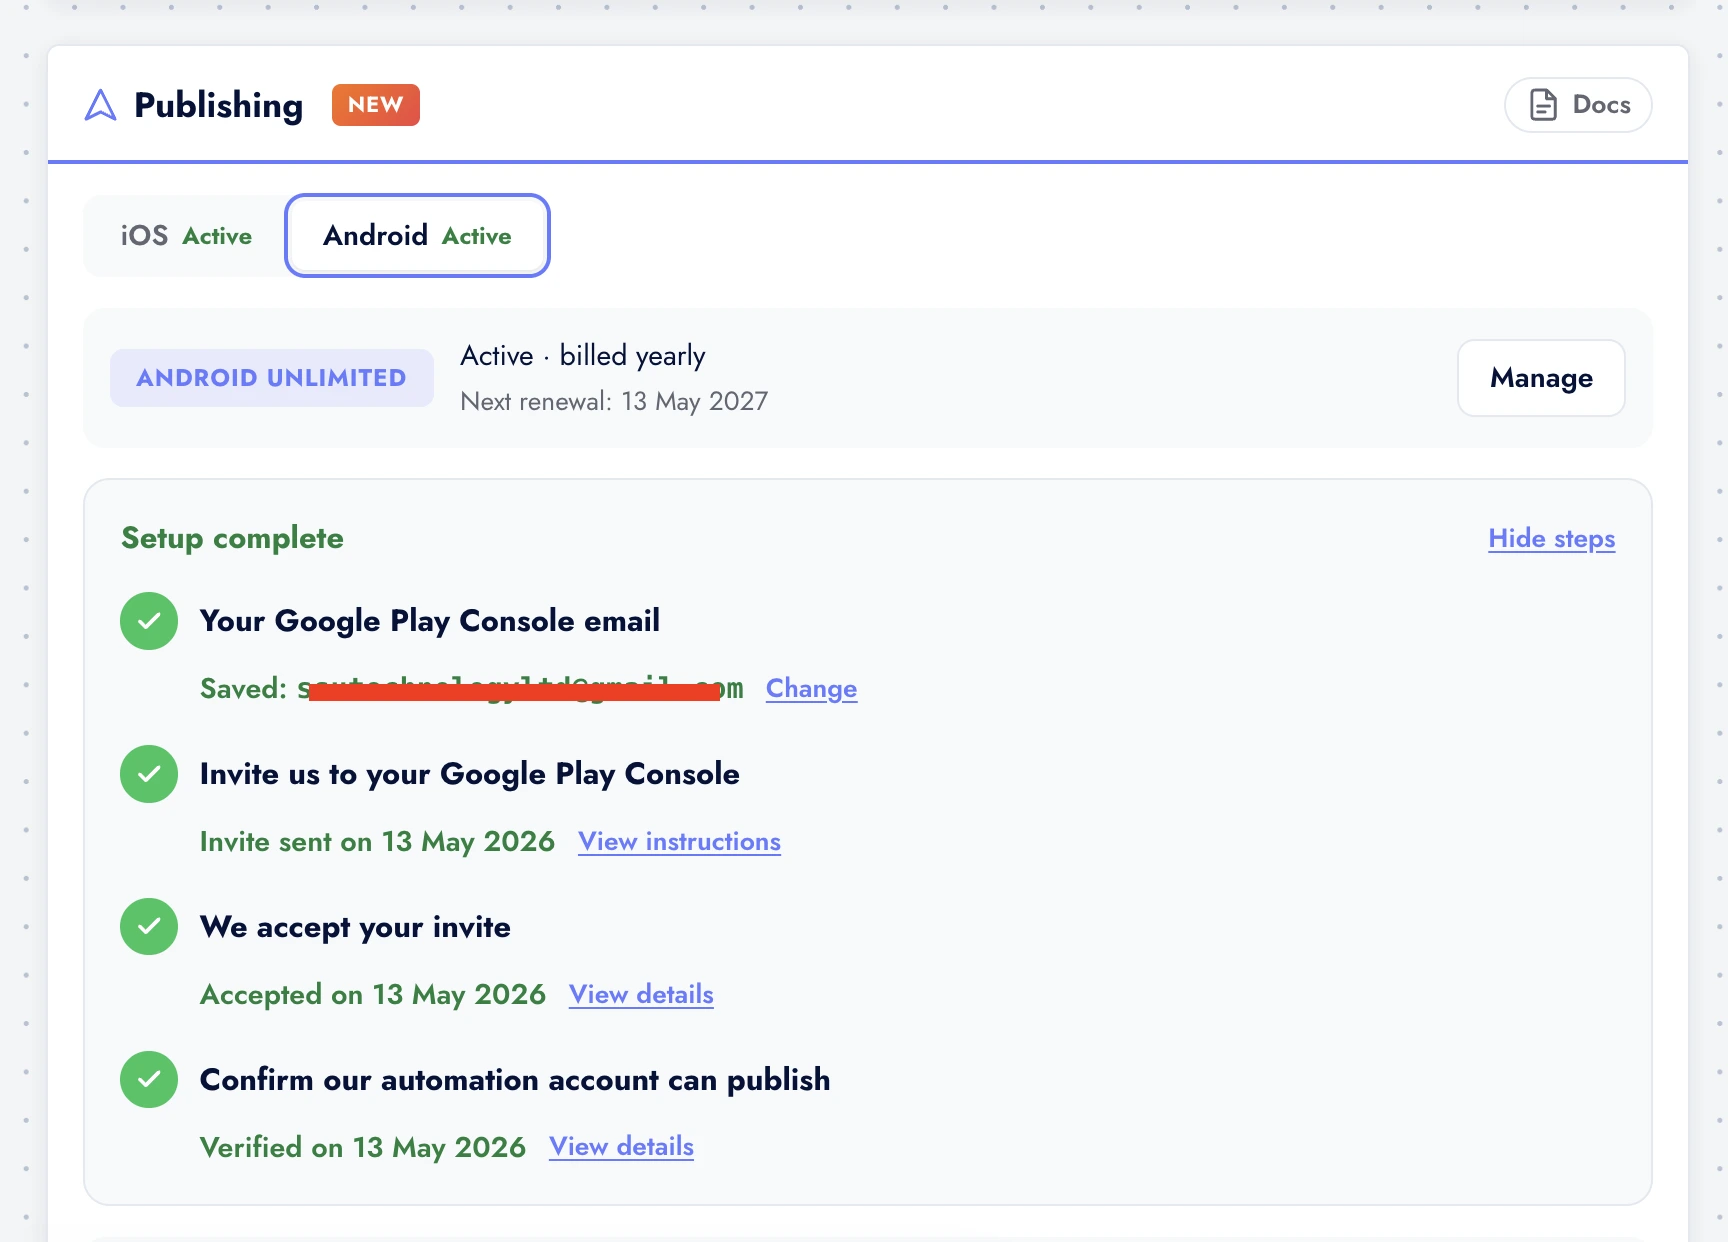
Step 1: Your Google Play Console email. The email you use to sign into Play Console. We use it for invite confirmation and as a developer contact.
Step 2: Invite us to your Google Play Console. Open Play Console > Users and permissions > Invite new user. Paste the email shown on your Publishing card (it is a unique service-account email - DO NOT use
publishing@swiftspeed.appfor Android, the per-app service account is different). Grant All app permissions for the app you want us to publish, with Admin (all permissions) as the role.Step 3: We accept the invite. Google notifies us within a few minutes. The system polls Play Developer API in the background, marks the step complete, and unlocks Start publishing.
Why We Need Admin Permission
Both stores require Admin-level permissions for the publishing flows we automate. Anything less and the upload fails.
iOS - App Manager role cannot upload to TestFlight via API; only Admin and Account Holder can. Apple specifically prevents the lesser role from using
iTMSTransporter(which is what fastlane pilot wraps).Android - the Play Developer API requires
androidpublisher.edits.commitpermission, which only the Admin (all permissions) role grants. Custom permissions roles in Play Console do NOT include this scope.What this means for you - we can submit on your behalf, but we cannot pay your developer fees, delete your apps, transfer ownership, or change billing. The Admin role is scoped to a specific app inside your account, not your whole developer account.
Revoking access - you can remove us at any moment by deleting our user from your developer account. Your apps stay yours and stay live; we just stop receiving submissions for them.
Starting a Submission
Once setup is done, every future submission is one click.
Make sure your latest changes are saved in the editor. The build artefact is taken from the current state of your app, not a snapshot.
Open the Publishing card.
Pick the platform tab (iOS or Android). If both are set up, you submit each independently - they queue separately on our build pipeline.
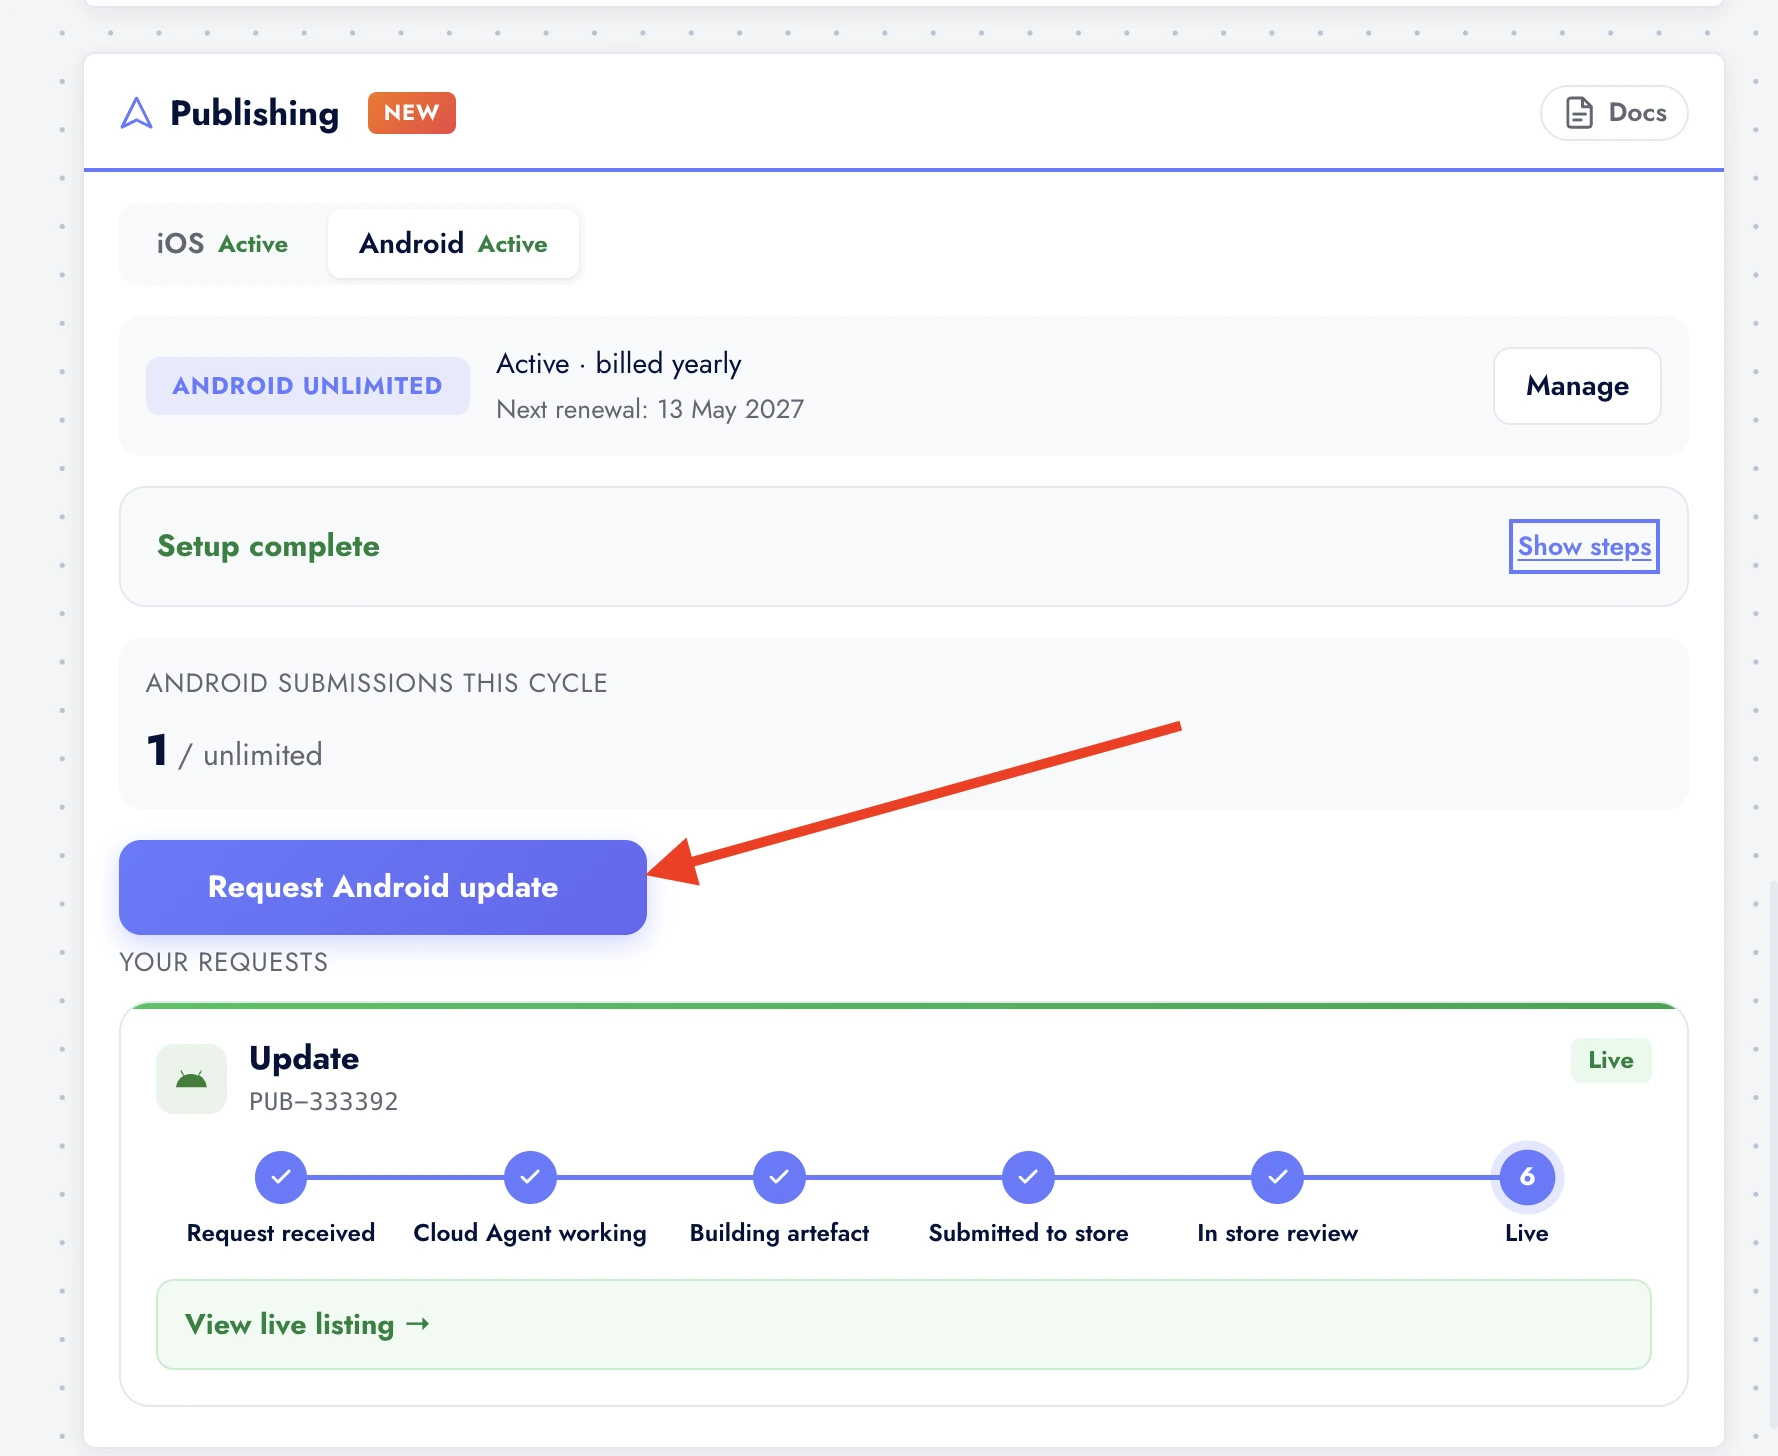
Click Start publishing.
The status flips to Queued. From here it moves through Building, Submitted, Store review, and finally Live. The card surfaces the current state in real time.
What Happens Behind the Scenes
Each submission goes through this pipeline. The card tells you where it is in plain language; this section is for the technically curious.
Queued - your request is in line. Usually a few seconds.
Building - our build cluster compiles the artefact. AAB or APK for Android (Gradle), IPA for iOS (Xcode archive on a dedicated Mac in our fleet). Builds take 3 to 12 minutes depending on app size.
Uploading - artefact pushed to the store. Android goes through the Play Developer API to the production track. iOS goes through fastlane pilot to App Store Connect.
Submitted to store - the store has received the upload and is processing it. Apple typically takes 5 to 30 minutes to process the IPA; Google is usually instant for the upload itself.
Store review - the store is reviewing the build. Apple averages 24 to 72 hours. Google averages 2 to 24 hours for updates and 1 to 7 days for first publishes.
Live - the build has gone live to end users. Our watcher detects this, the card flips to Live.
Updates Are Just More 1-Click Submissions
Make your edits in the Swiftspeed editor as usual. Add features, change content, tweak design - whatever the update is.
Open the Publishing card. Click Start publishing again.
We bump the versionCode and versionName for you. Android requires versionCode to strictly increase per upload; we handle that. iOS does not enforce the same constraint but we bump the build number anyway so TestFlight can tell builds apart.
You do NOT need to bump the version yourself. If your editor still shows
2.0.1and the previous release was2.0.1, we bump it to2.0.2automatically. You can override the version in the editor before clicking publish if you want a specific number.
When a Submission Gets Rejected
Apple and Google reject submissions for a variety of reasons. When that happens, we handle the customer-facing recovery so you do not have to read rejection emails.
You see the rejection in the editor. The card moves to Rejected with the reason text Apple or Google sent us. We translate the official language into plain English where we can.
Common rejections we recover from automatically: - Missing release notes (we generate generic ones and re-submit). - Export compliance question unanswered (we declare standard HTTPS-only compliance and re-submit). - Build version collision (we bump and re-submit).
Common rejections that need your input: - Privacy policy URL is missing or broken (you fix it in Settings > Privacy Policy, then click Rebuild and resubmit). - App content claims a feature you do not have (you adjust the description, then re-submit). - Demo account credentials are wrong (you give us new ones, we update the App Review notes and re-submit).
Permanent rejections - some rejections are policy violations that cannot be fixed by a rebuild (illegal content, banned categories, fraudulent claims). The card surfaces these as Cannot resubmit with the specific rule cited. We are not able to bypass store policies.
Status, Replies, and Customer Support
Status pill - the card always shows the current state. Click it to expand a timeline that lists every transition (queued at, building started at, submitted at, live at).
Direct replies to our team - the right-hand drawer on every submission has a message thread. Anything you reply there reaches our operator. We reply through the same drawer and you get an email.
Status emails - we email you at every milestone: build complete, submitted to store, in review, live, rejected. You can turn these off in account preferences if they get noisy.
Manual operator escalation - if a submission stalls for more than 4 hours, our operator gets paged automatically. You do not need to chase us.
Pricing and Quotas
Standard - 4 submissions per platform per month per app. Suitable for stable apps that update monthly or less. Both iOS and Android are priced separately.
Unlimited - unlimited submissions per platform per month. Suitable for apps that ship every week or for first-time launches with multiple rejection cycles.
Billing - monthly or yearly, per app per platform. Yearly is discounted. You only pay for the platforms you enable; an iOS-only app is not charged for Android.
First publish (initial submission) - on first-time apps we charge a one-time setup fee that covers the extra back-and-forth on the listing setup (data safety form, content rating questionnaire, App Information tab, screenshots, descriptions). The setup fee is waived if you bring screenshots and descriptions to the kickoff call.
Cancelling - you can cancel at any time. Your existing submissions complete; we just stop accepting new ones. Your apps stay live on the store; you keep ownership of everything in your developer accounts.
What You Still Need to Do
1-Click Publishing automates the submission. It does not automate everything around it.
Apple Developer Program enrollment ($99 / year) - you sign up at https://developer.apple.com/programs/enroll/. This is your developer account and we cannot pay the fee for you. Approval takes 24 to 48 hours for individuals, longer for companies (D-U-N-S verification).
Google Play Console enrollment ($25 one-time) - you sign up at https://play.google.com/console. Same situation - your account, your registration.
Privacy policy URL - required by both stores. Use Settings > Privacy Policy in the editor to generate a hosted policy URL you can paste into App Store Connect and Play Console.
App icon and feature graphic - you can either upload them yourself in the editor (Customize > App Icon) or use our App Icon Generator to produce every density.
App screenshots - we can capture screenshots automatically from your live app for first-publish submissions; for marketing-grade screenshots with captions and phone frames, use our Screenshot Mockup Generator.
App description, keywords, category - editorial decisions. You write them, we paste them. Worth spending time on; the App Store and Play Store both rank by this copy.
Switching Between Self-Publish and 1-Click
You can switch at any time. If you start with self-publish and want to move to 1-Click, sign up for the publishing plan and complete the setup steps - we take over the next submission.
Same bundle ID, same app on the store. Both routes use the same bundle ID and the same store listing. Users do not see anything change; updates flow normally through their existing install.
Tips
Set up both platforms even if you only ship one today: The friction is what stops most people from launching cross-platform.
Use the unlimited plan during launch: First launches get rejected one to three times on average. You do not want to be metering submissions while iterating with App Review.
Keep release notes short: "Bug fixes and performance improvements" is what 90% of apps ship. Saves you and us time.
Watch the Live email: When we email you "your update is live", that is when you start your marketing push, not when you clicked Start publishing. The store rollout takes 2 to 72 hours after our submission.
Reply to store reviews: The store algorithms reward developer engagement. A "thanks for the feedback" within 48 hours moves your ranking; 1-Click Publishing does not handle review replies, that is on you.